Once you familiarize yourself with these positions, it will unconsciously help you to recognize the opportunities for checkmates during your game. Your goal definitely shouldn’t be to memorize them, but having simply seen them once or a couple times is definitely enough, rest will come with practice and time.
A Side Note on notation i use in this article:
Before we start looking at more examples, I want to briefly share a note about the notation i’ll be using throughout this article. When i’ve first started playing Dobutsu, I oriented myself using a chess-like notation in my head. Since I've got used to it a lot and find it more convenient I'll use this notation and I've also always studied from Gote (second player perspective) as the game according to the solution (as mentioned above) should ideally result in Gote’s victory:
Also if you want to follow along examples by setting up the positions to study it on our own, you could use the Analysis or Editor tools on Pychess.org. (I’d highly recommend you to use them to get the best out of this article.)
Let’s see a couple of mating patterns shown above in action now. Most common type of checkmates in Dobutsu are mates with Double Chicks side by side, Chick+Giraffe side by side, Backrank-mates usually with Elephant+Giraffe, Double Elephant mate, Checkmating Lion on the side of the board with Elephant+Giraffe/Chick. There are certainly more of them, but these are the ones I'll be covering with examples for now.
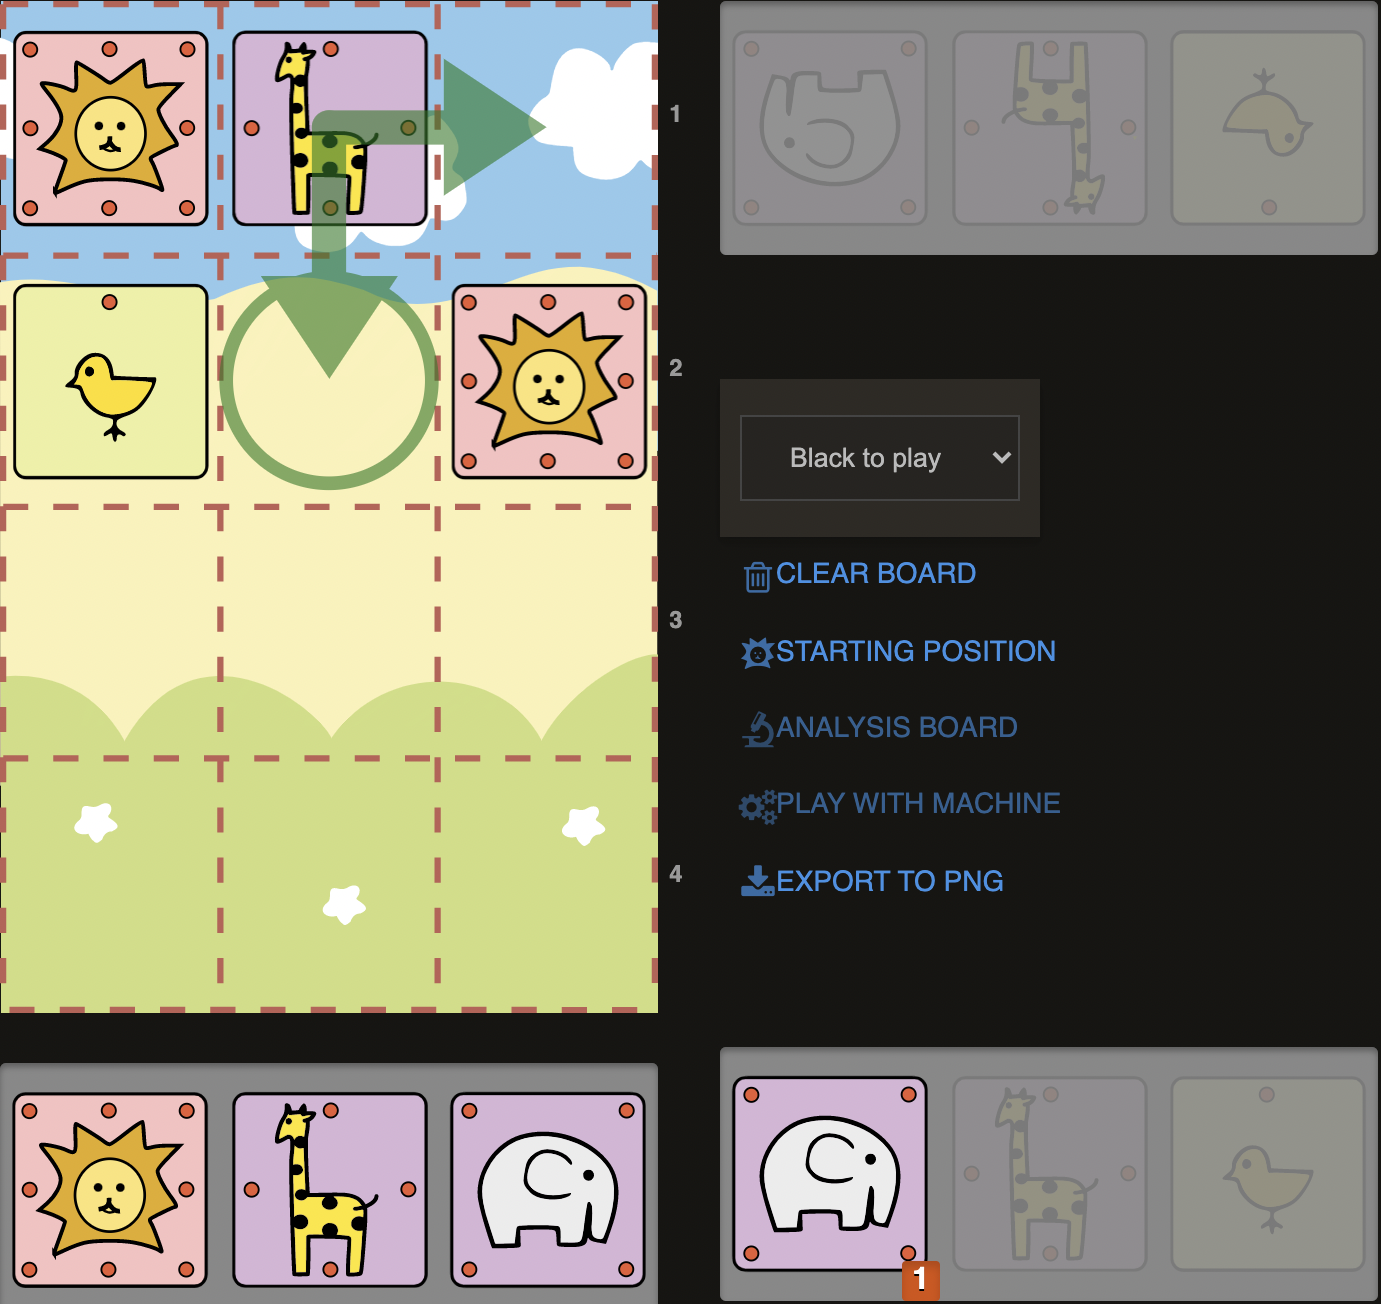
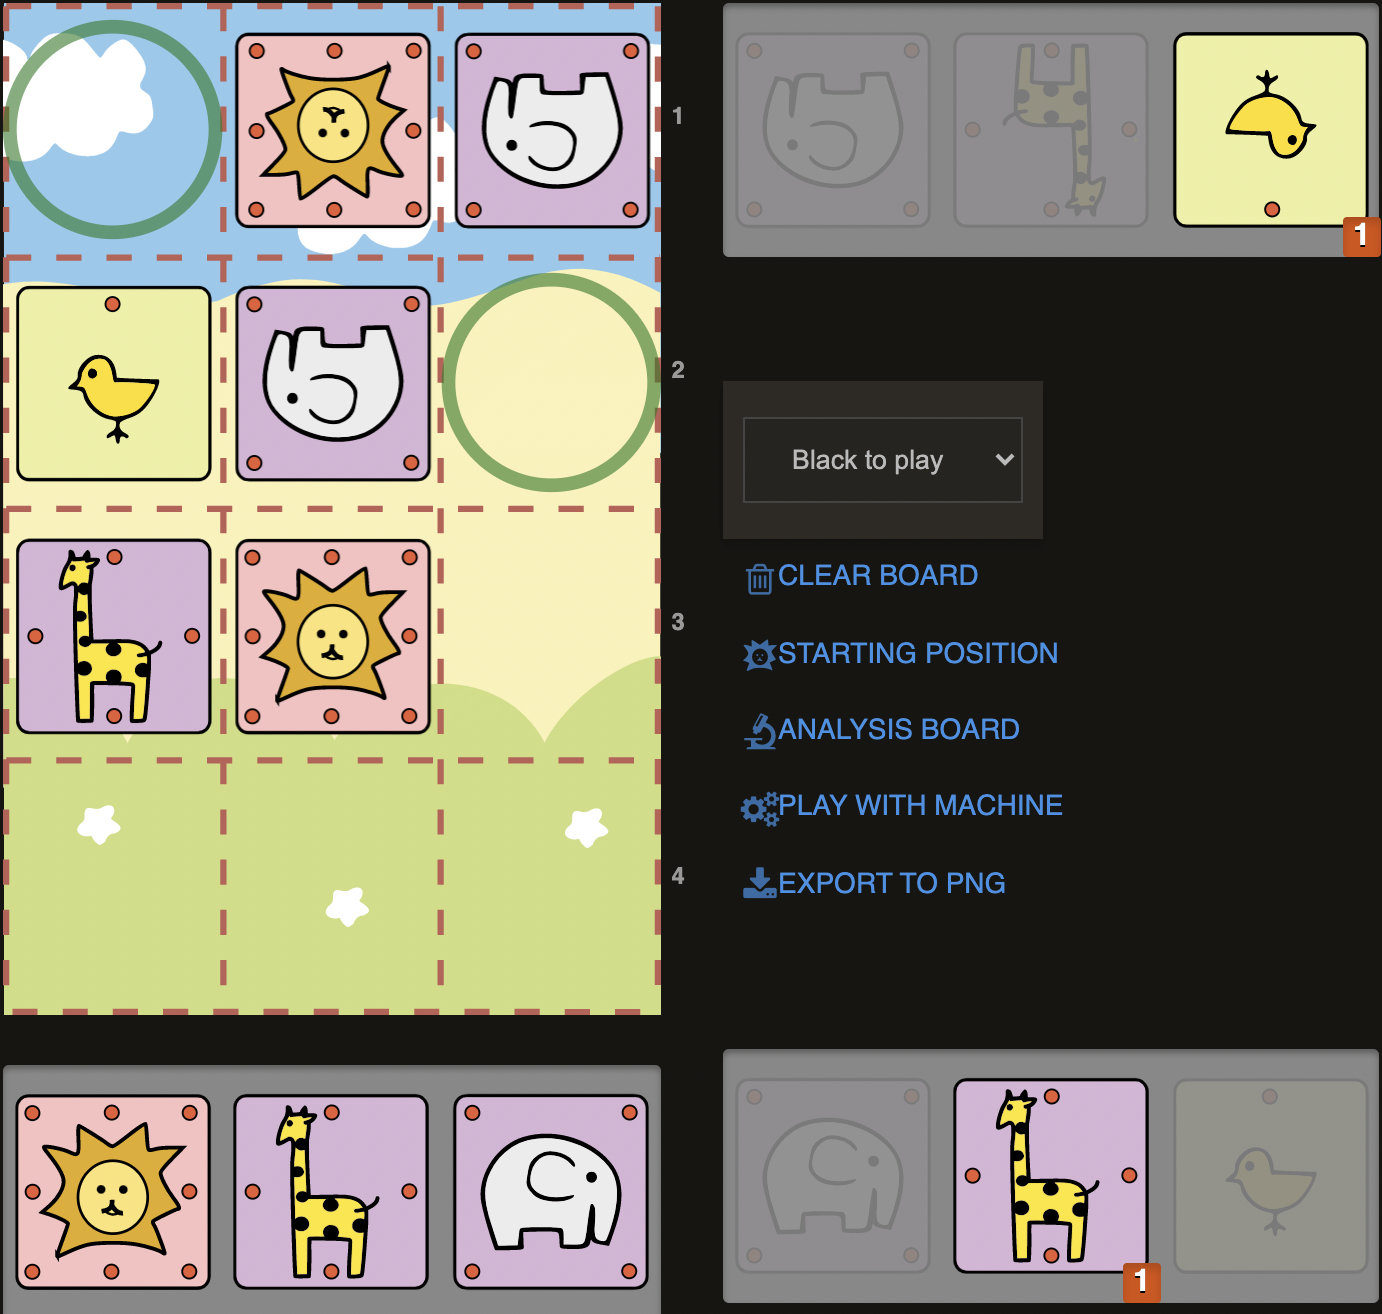
D1)
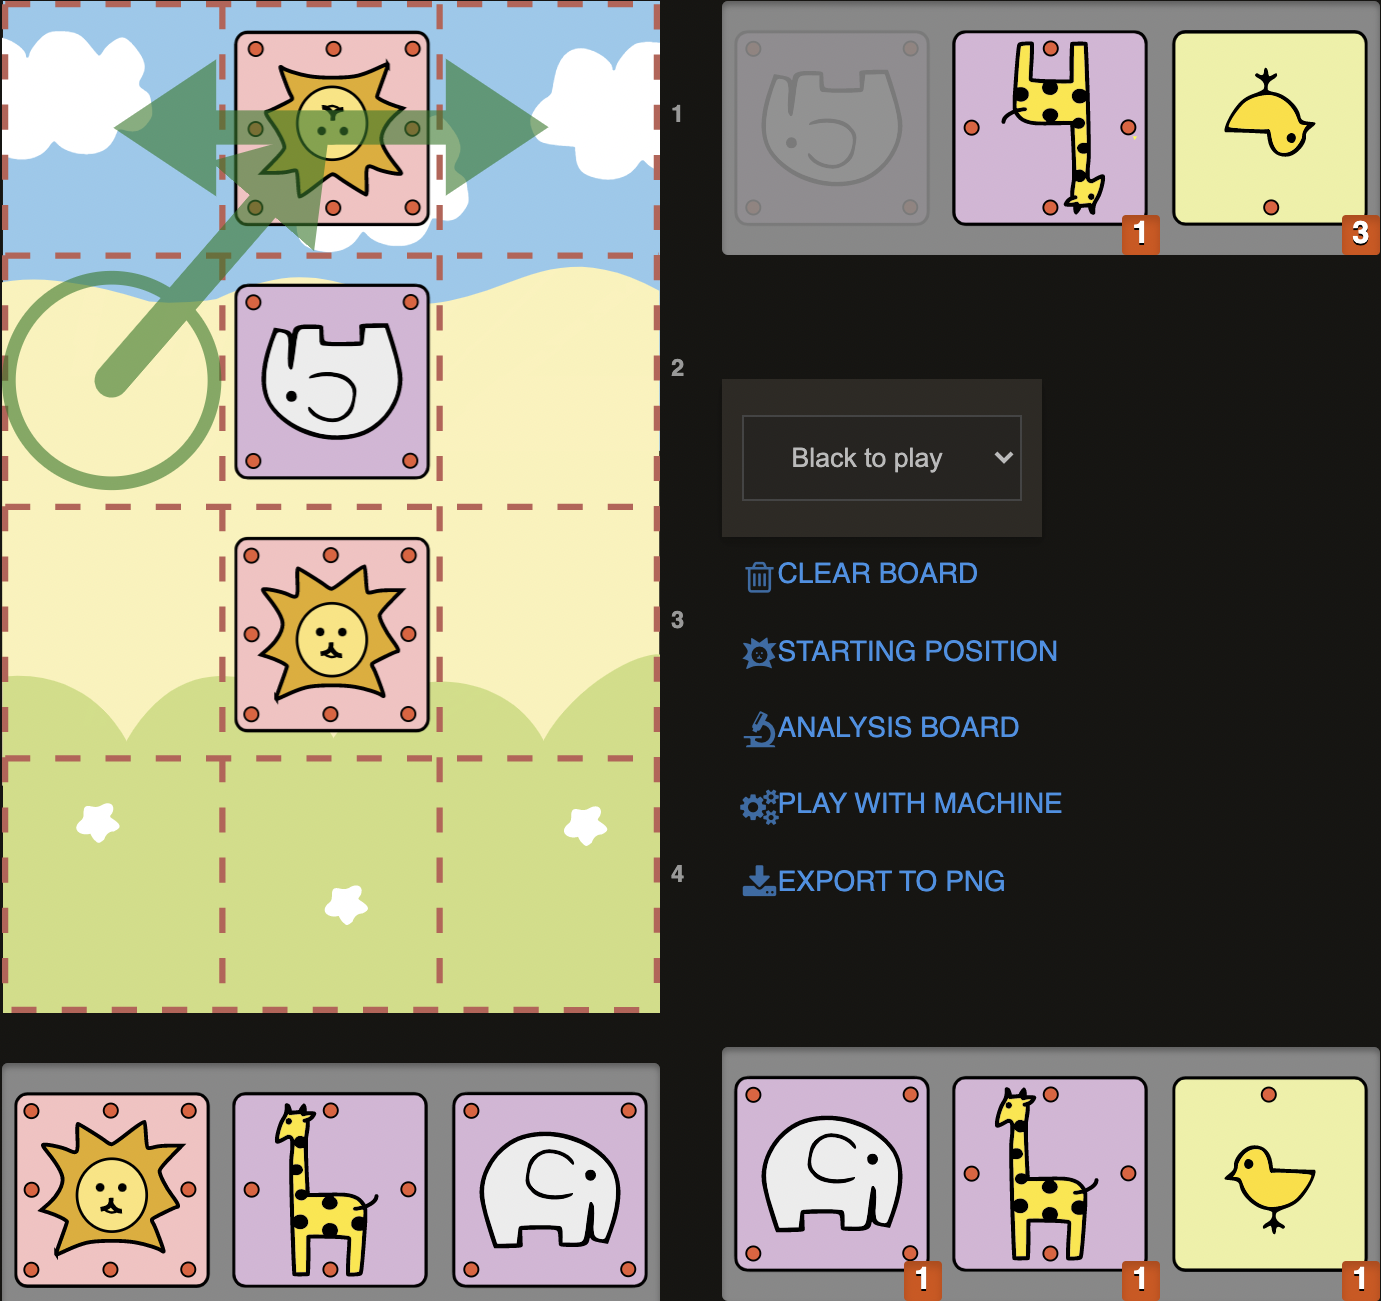
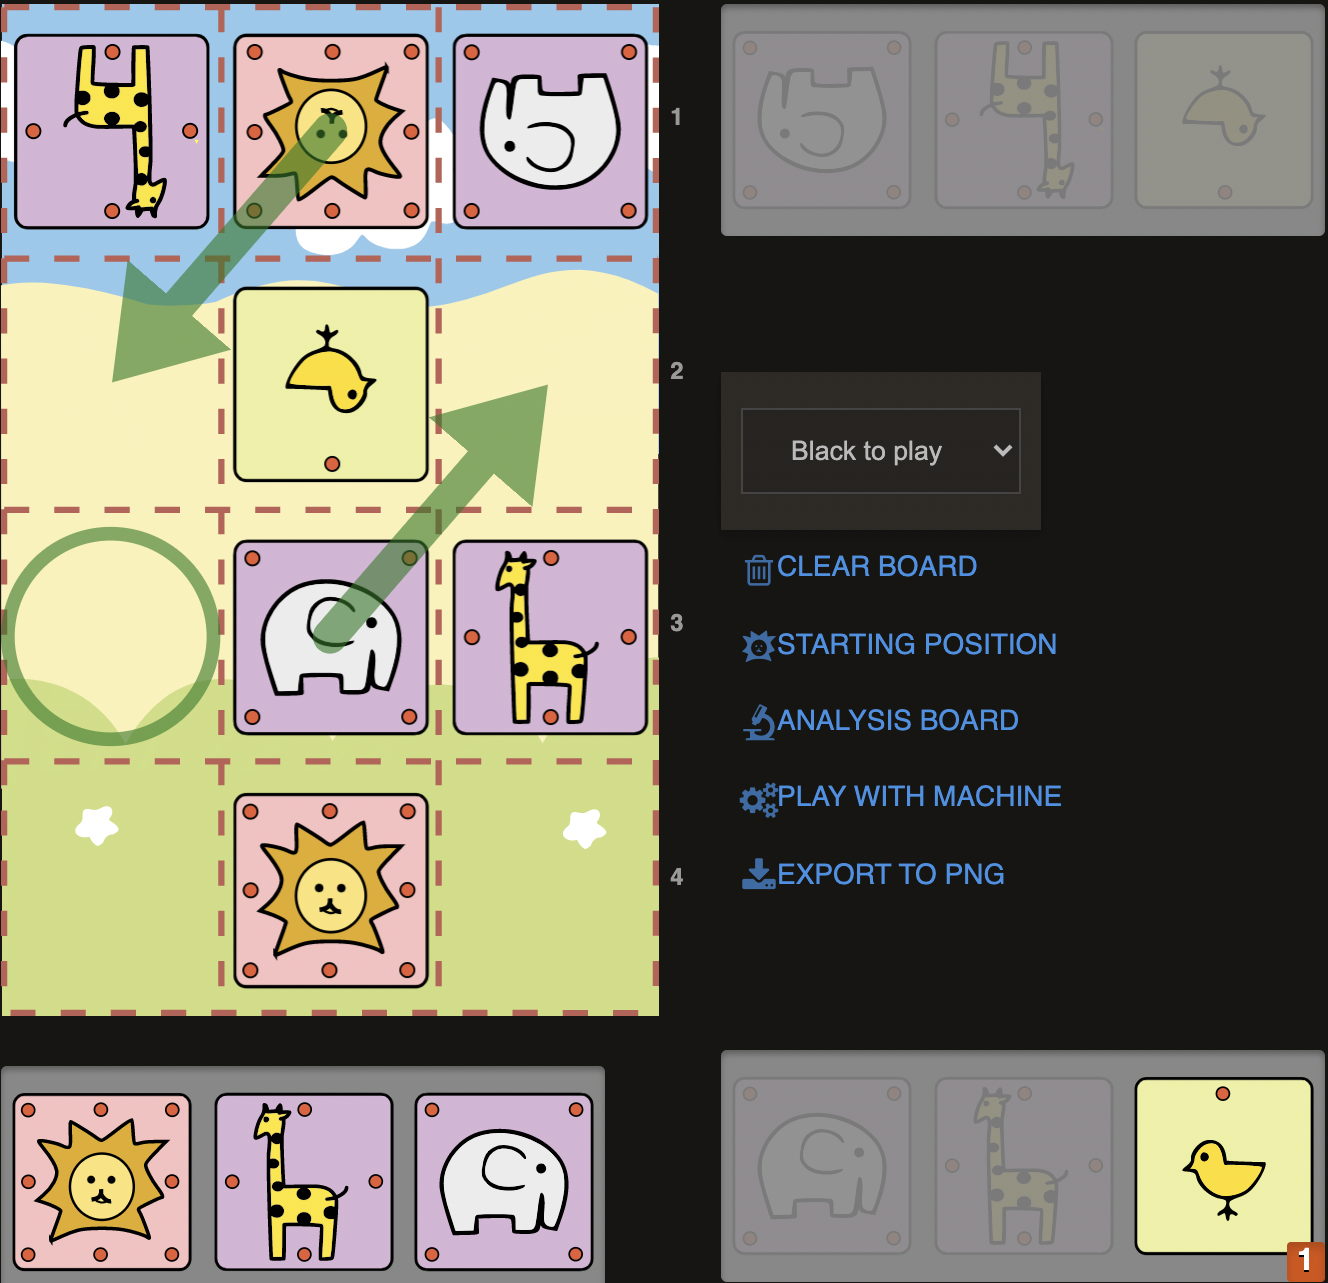
Lion on second rank can be very dangerous as it can participate in checkmates, as well as setting up campmates. Here we have an Elephant and Giraffe in our pocket, which we could use to deliver a backrank checkmate with the help of our Lion on second rank:
1. E@c3+! Sente’s Lion can only go to the left (2..La4) or to the right (2..Lc4), but both moves will be met with 2. G@b4# giving a bankrank checkmate. The example would also work without Sente’s Elephant on b3 as our Lion is controlling b3 and c3 squares anyway, but it is very usual for Sente’s Elephant to be placed on b3 in a practical game, so i included it. Another common version for this motif is with Sente’s Chick being on c3.
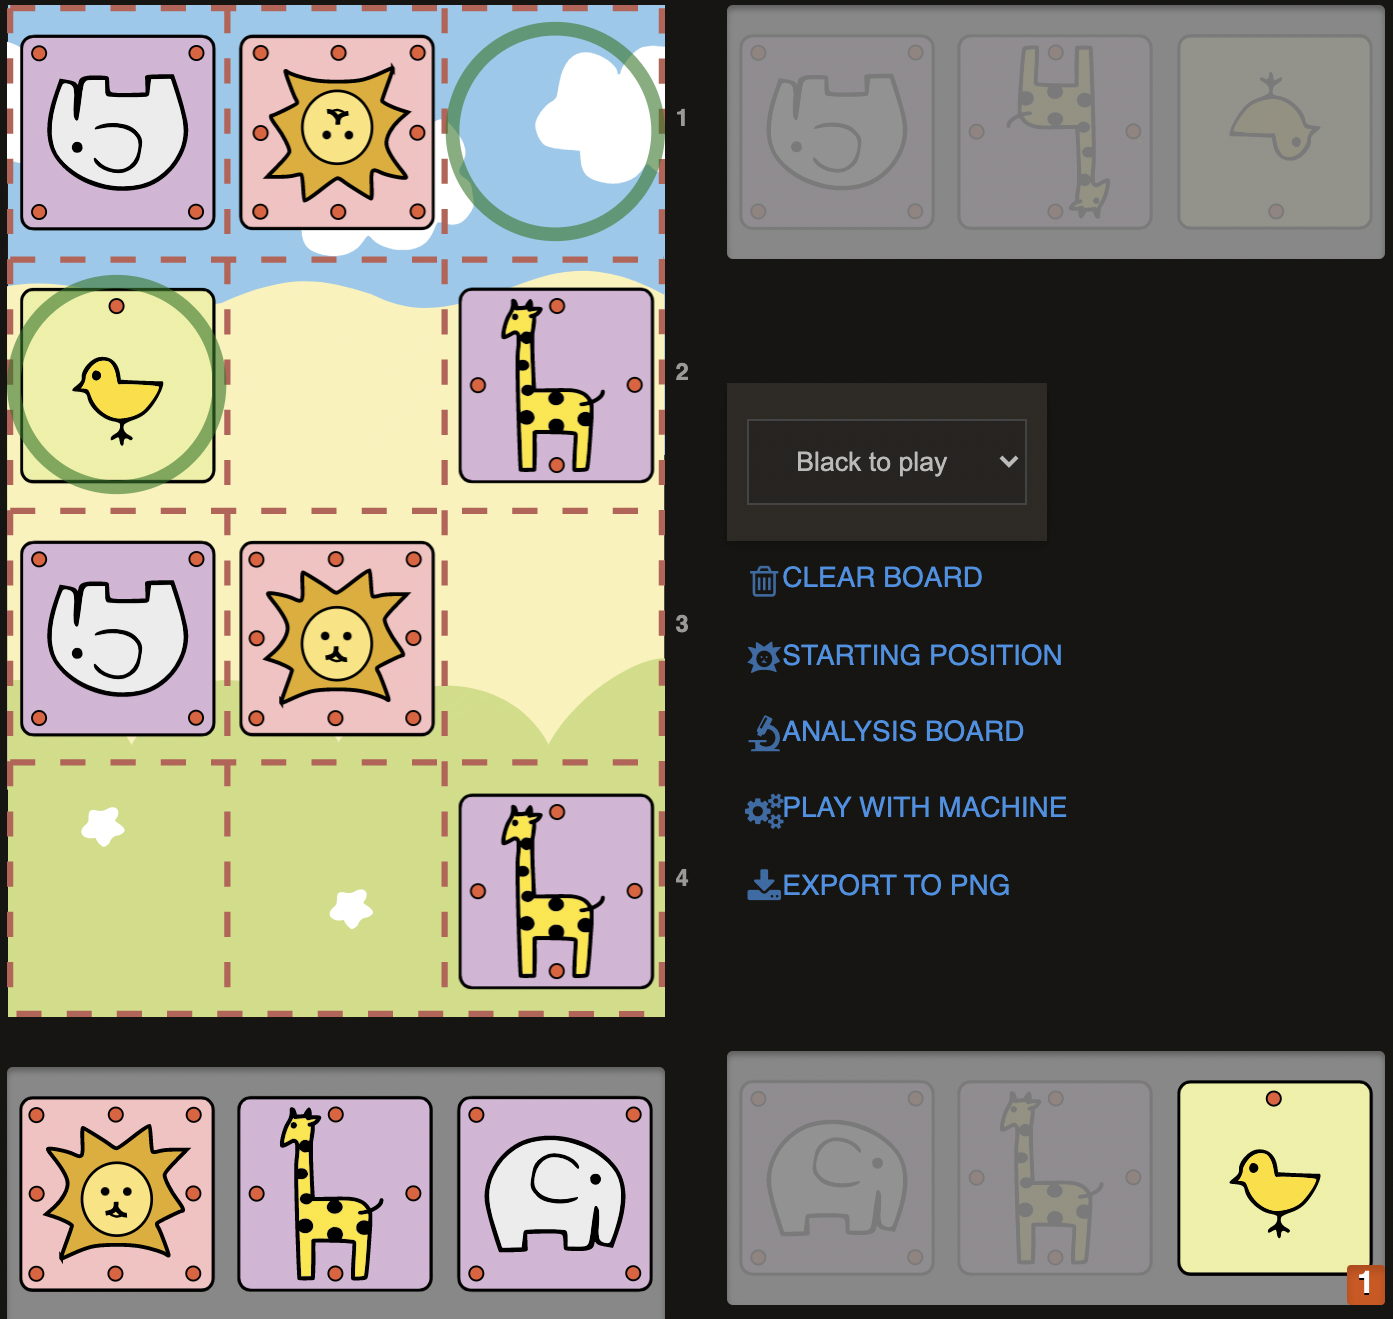
Giving a direct mate with two Giraffes side by side or two Chicks side by side (or Chick+Giraffe) is one of the most natural types for checkmates. In the following position we see this usual mate coming from a different angle (with an unusual way of aid by the Elephant):
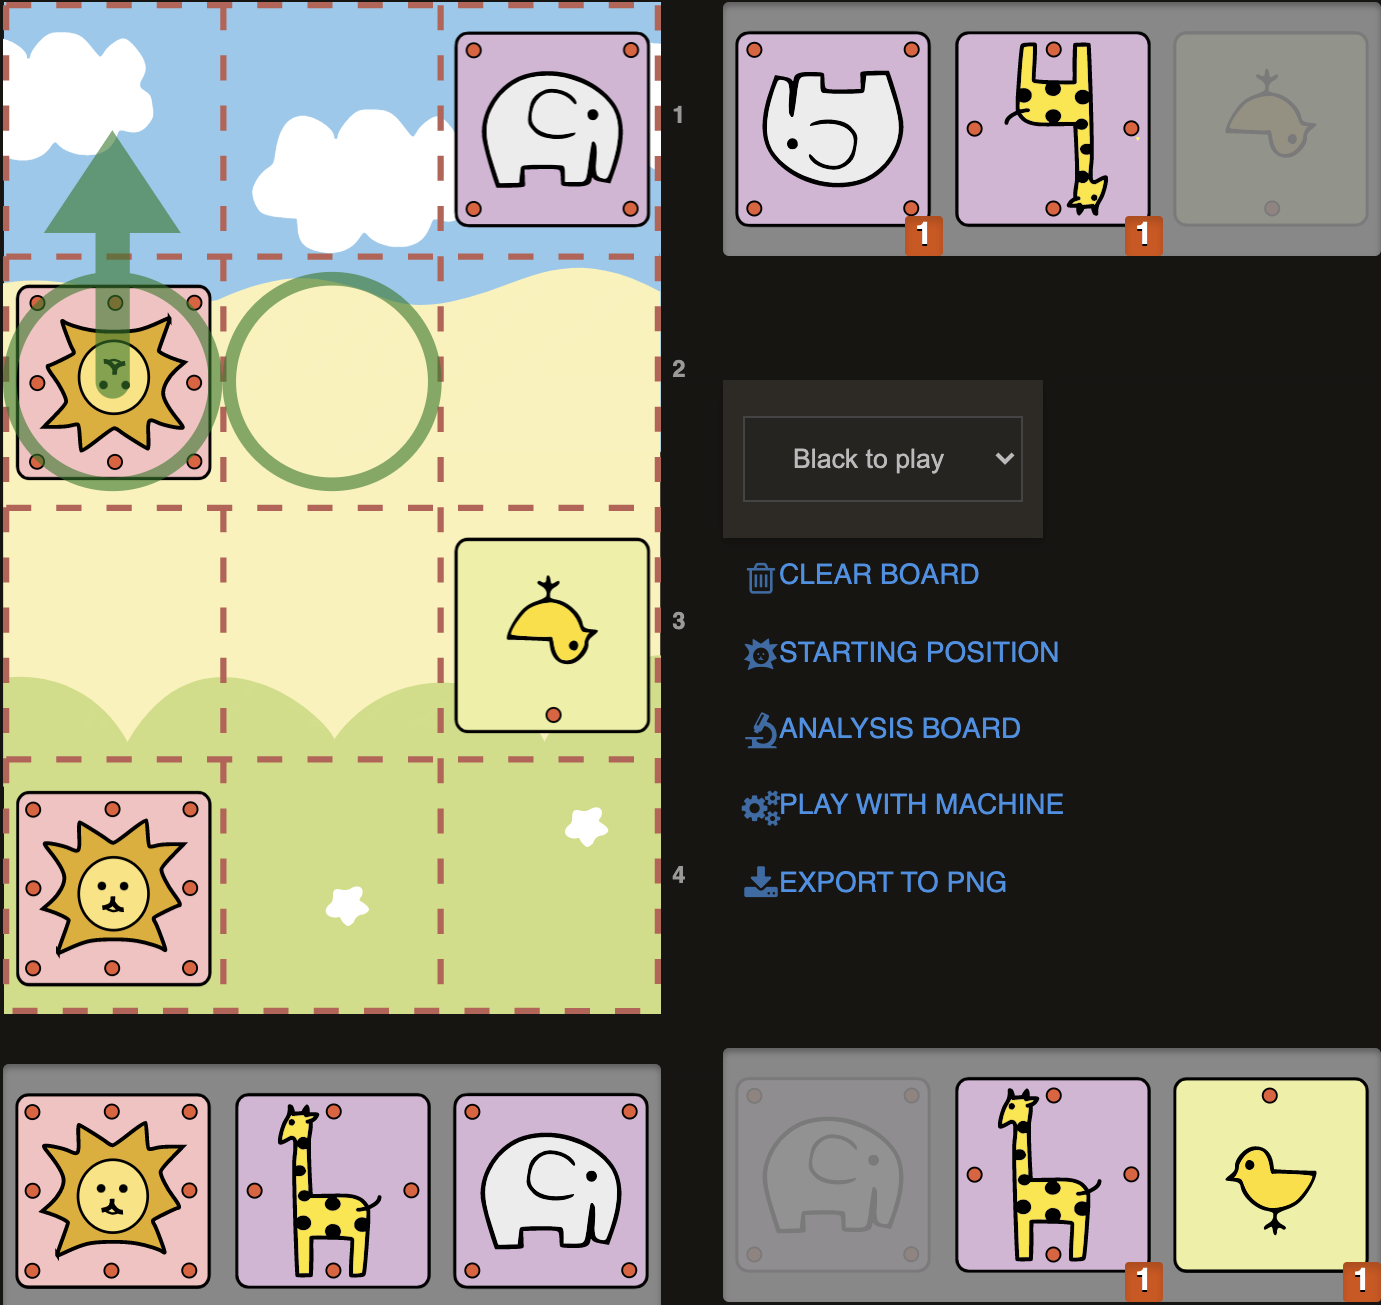
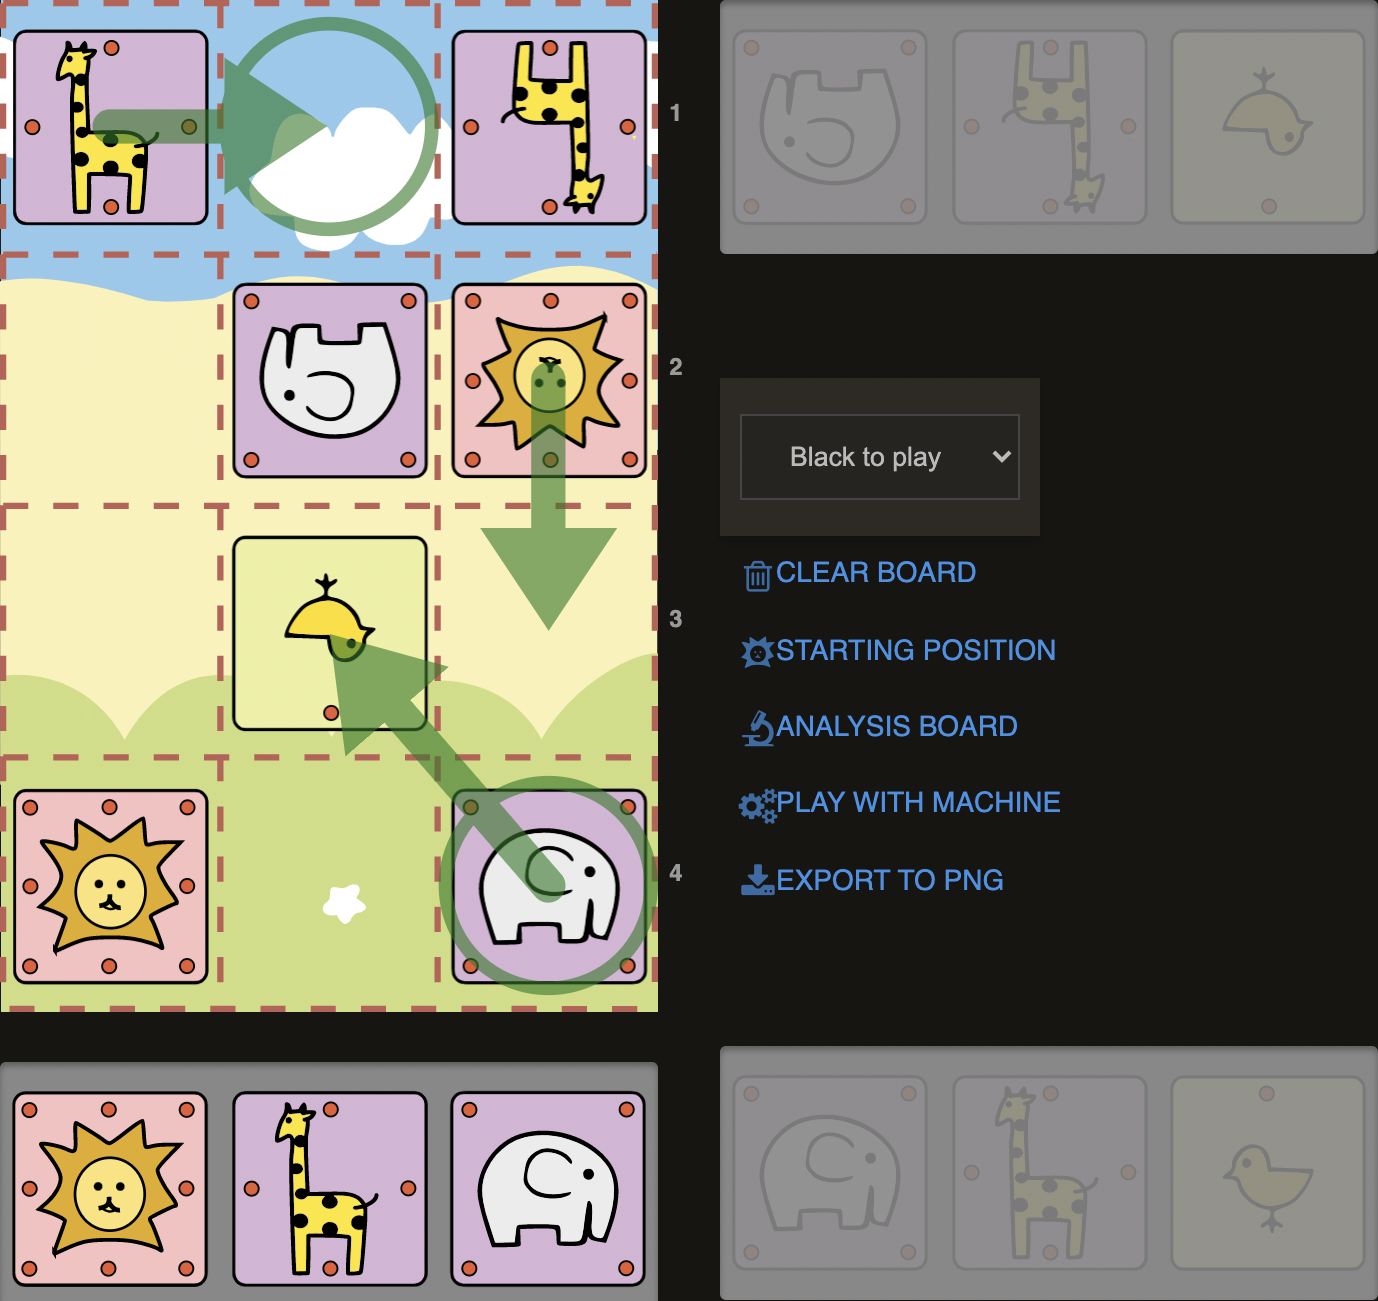
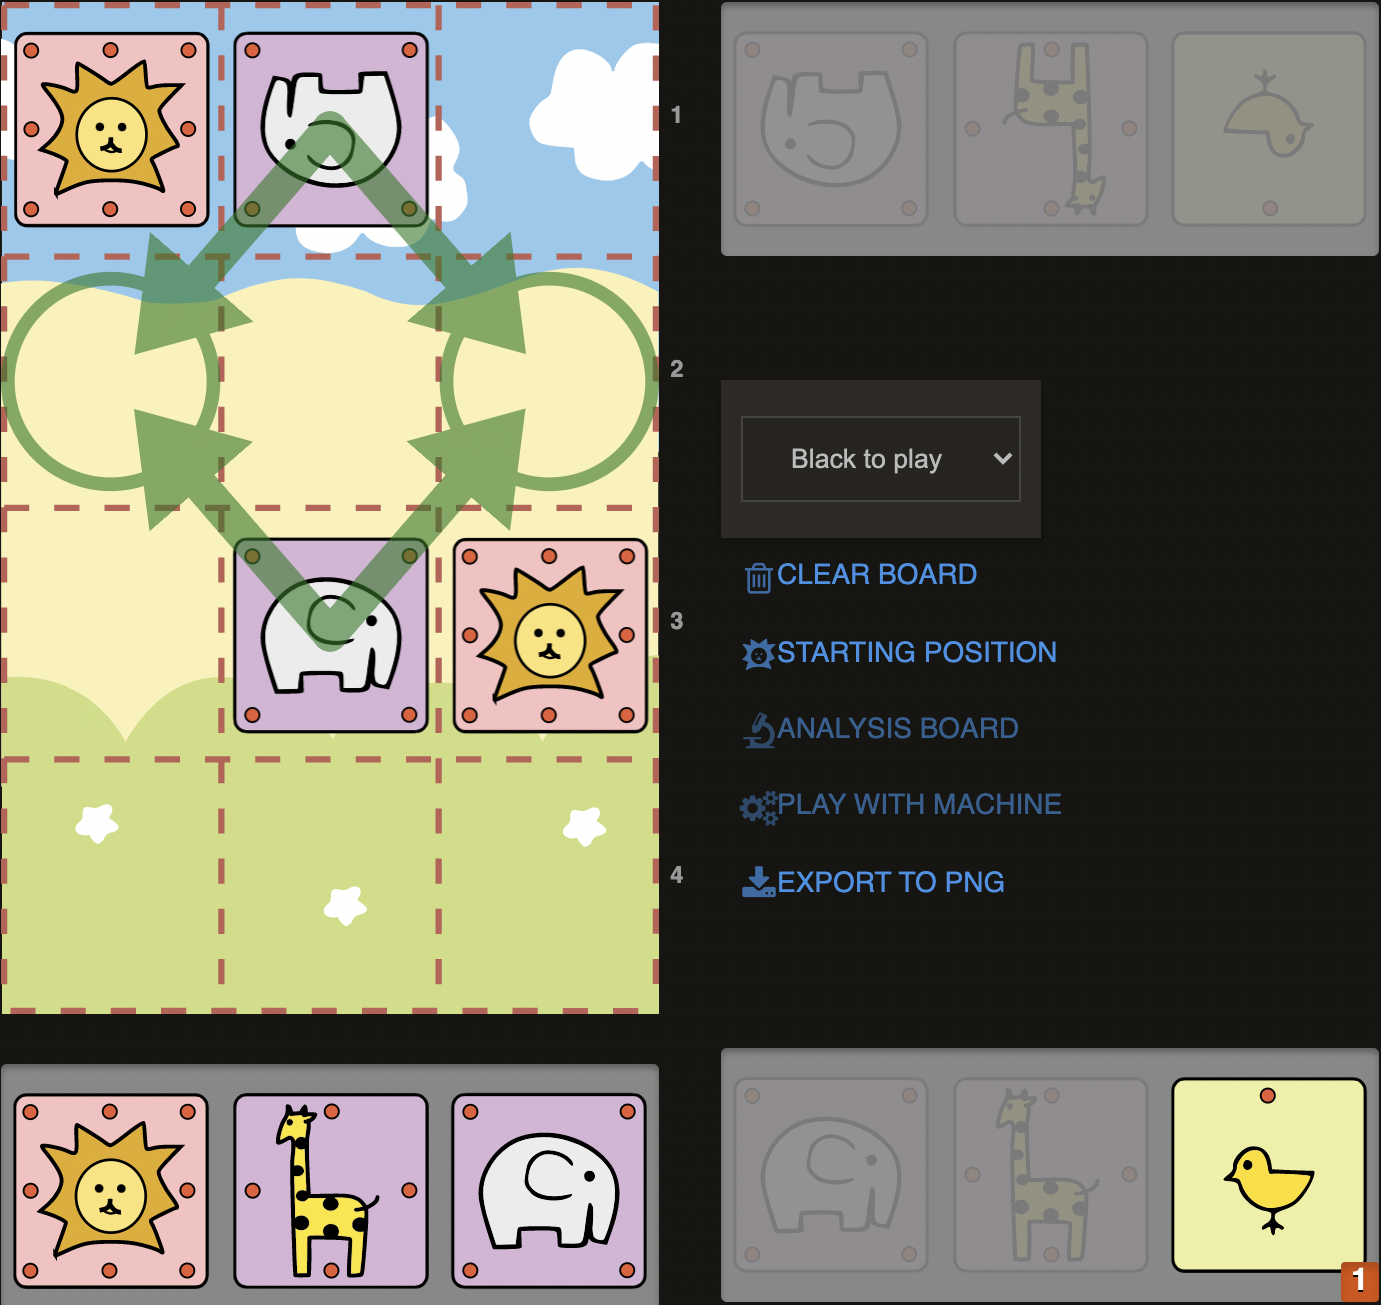
D2)
We have a chick and giraffe in our pocket. Our Lion is controlling b2 and b3 already. So dropping a Giraffe on b3 (1.G@b3) , which is defended backwards by the Elephant on c4 (usually we defend our pieces forwards like Elephant on a2 supporting G@b3), would force Lion to go to corner (1..La4). Since our powerful Giraffe on b3 would also control b4, opponents Lion would have no escaping square after 2.C@a3# .
King in the corner is always very susceptible to getting checkmated. In the following example we can see that no corner is safe for opponents Lion!
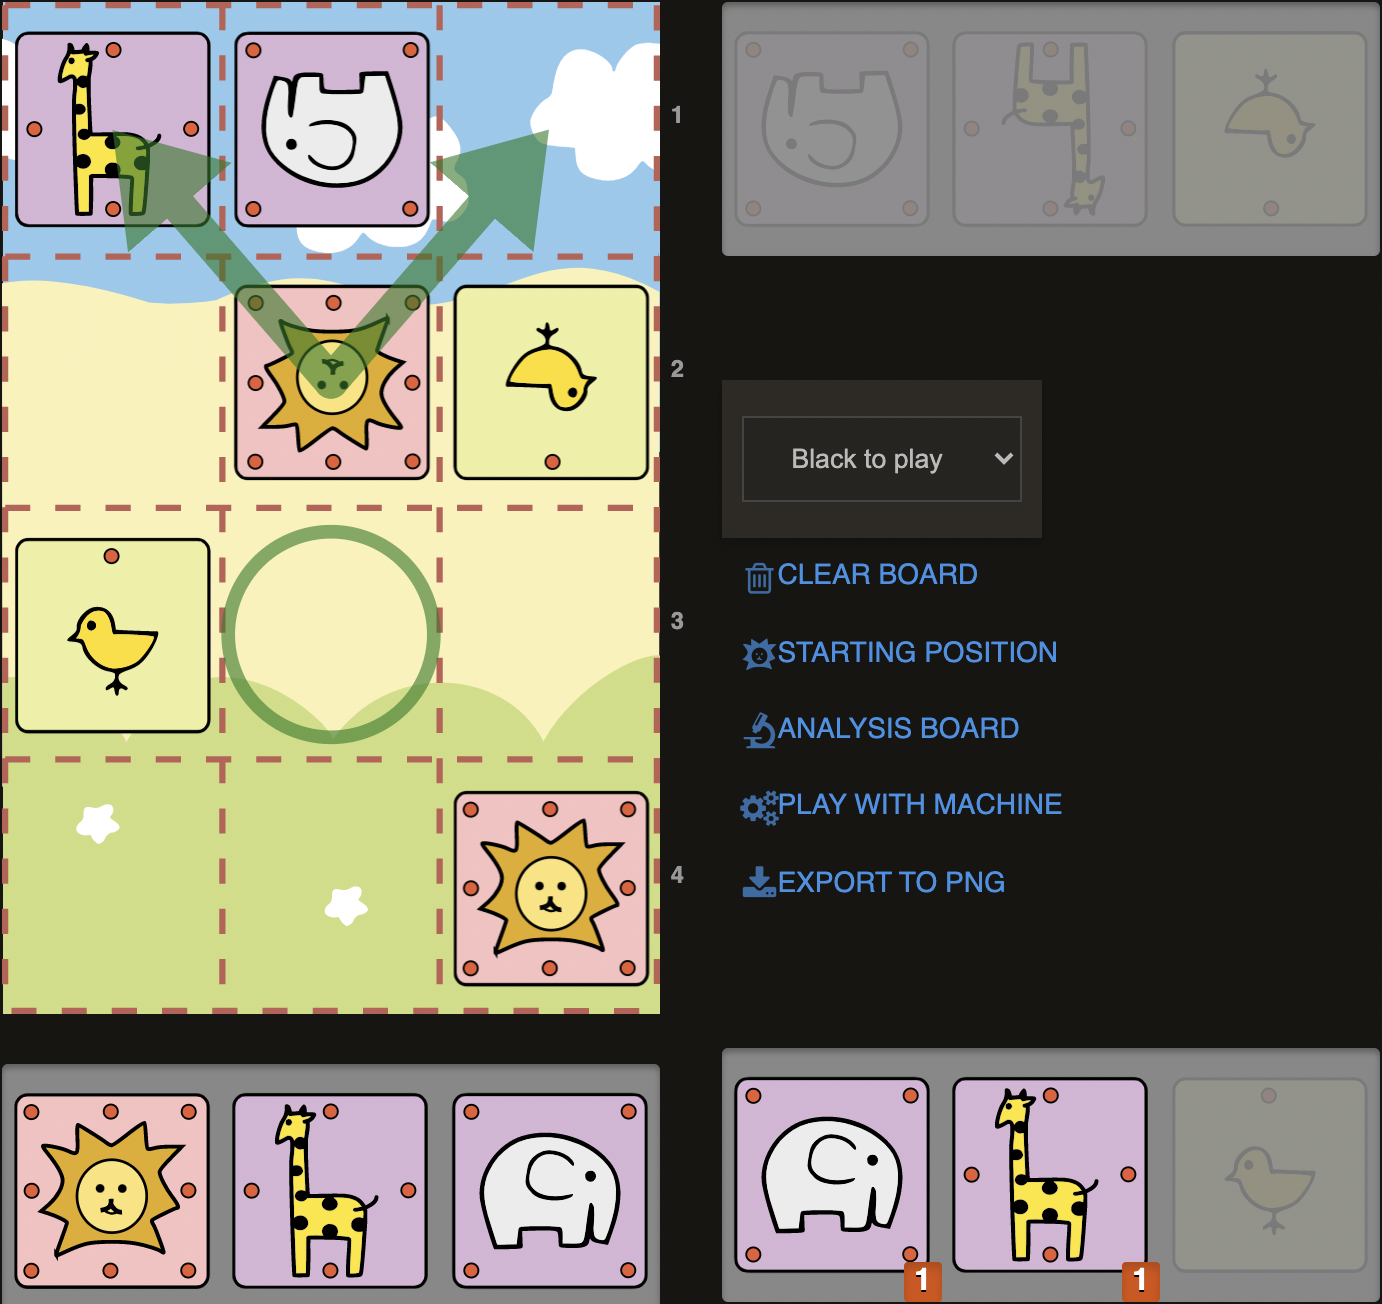
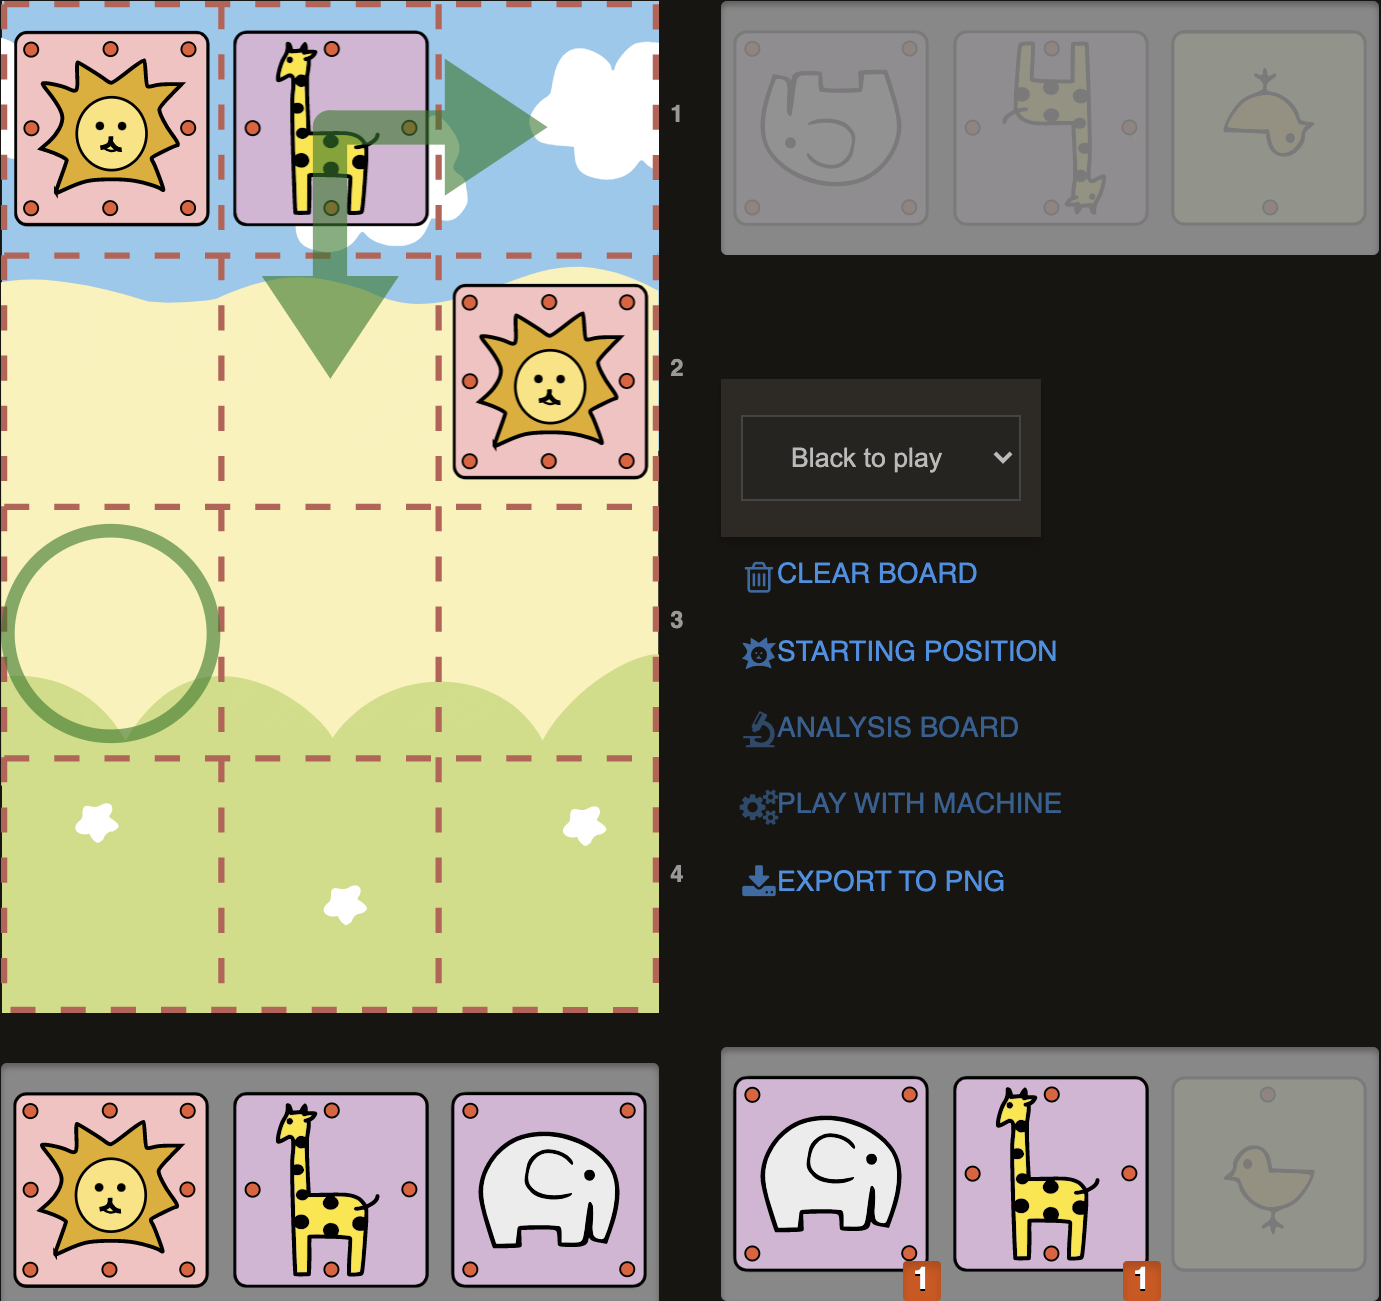
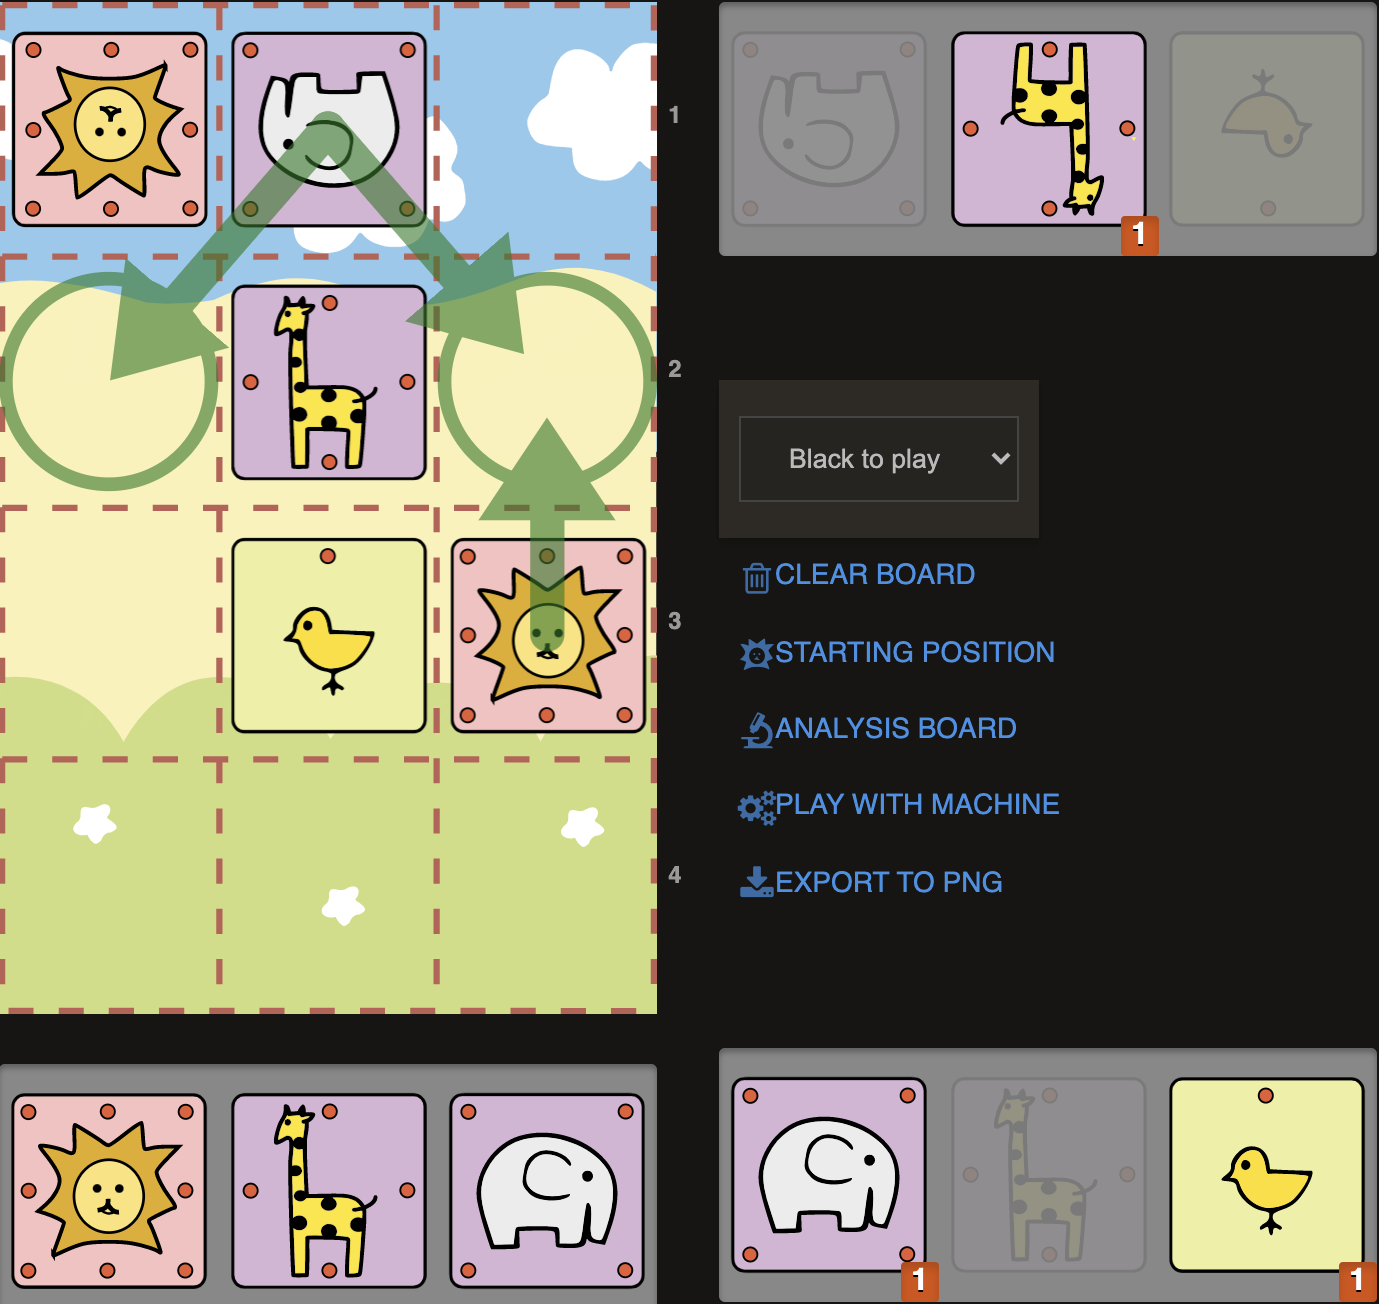
D3)
Sente’s Elephant and Chick are awkwardly placed here. Elephants are usually not so functional or effective, when they are in the middle of last rank like this, as they can only function defensively at most. (In chess we’d call it a bad bishop) Here Elephant on b4 is controlling only one square (a3). But the squares around it, such as a4-b3-c4 are completely undefended. A Giraffe on b4 however would protect all these three squares. Due to these defensive holes with the particular placement of Elephant and Chick like this, one should always keep the idea in mind that a Lion in the corner could get easily mated with a diagonal piece on b3, as b3 is not defended by Elephant on b4, but even worse, it is blocking Lions possible escaping route. So here we have an Elephant and Giraffe in our pocket. We could drop a Giraffe on b2 (1.G@b2) to send opponents Lion back to one of the corners, without even having to worry about our Giraffe on a4. Both moves, 1..Lxa4 or 1..Lc4 would be met by E@b3#. Whenever you see opponents Elephant and Chick placed like this, always think of the possibility of this mating pattern.
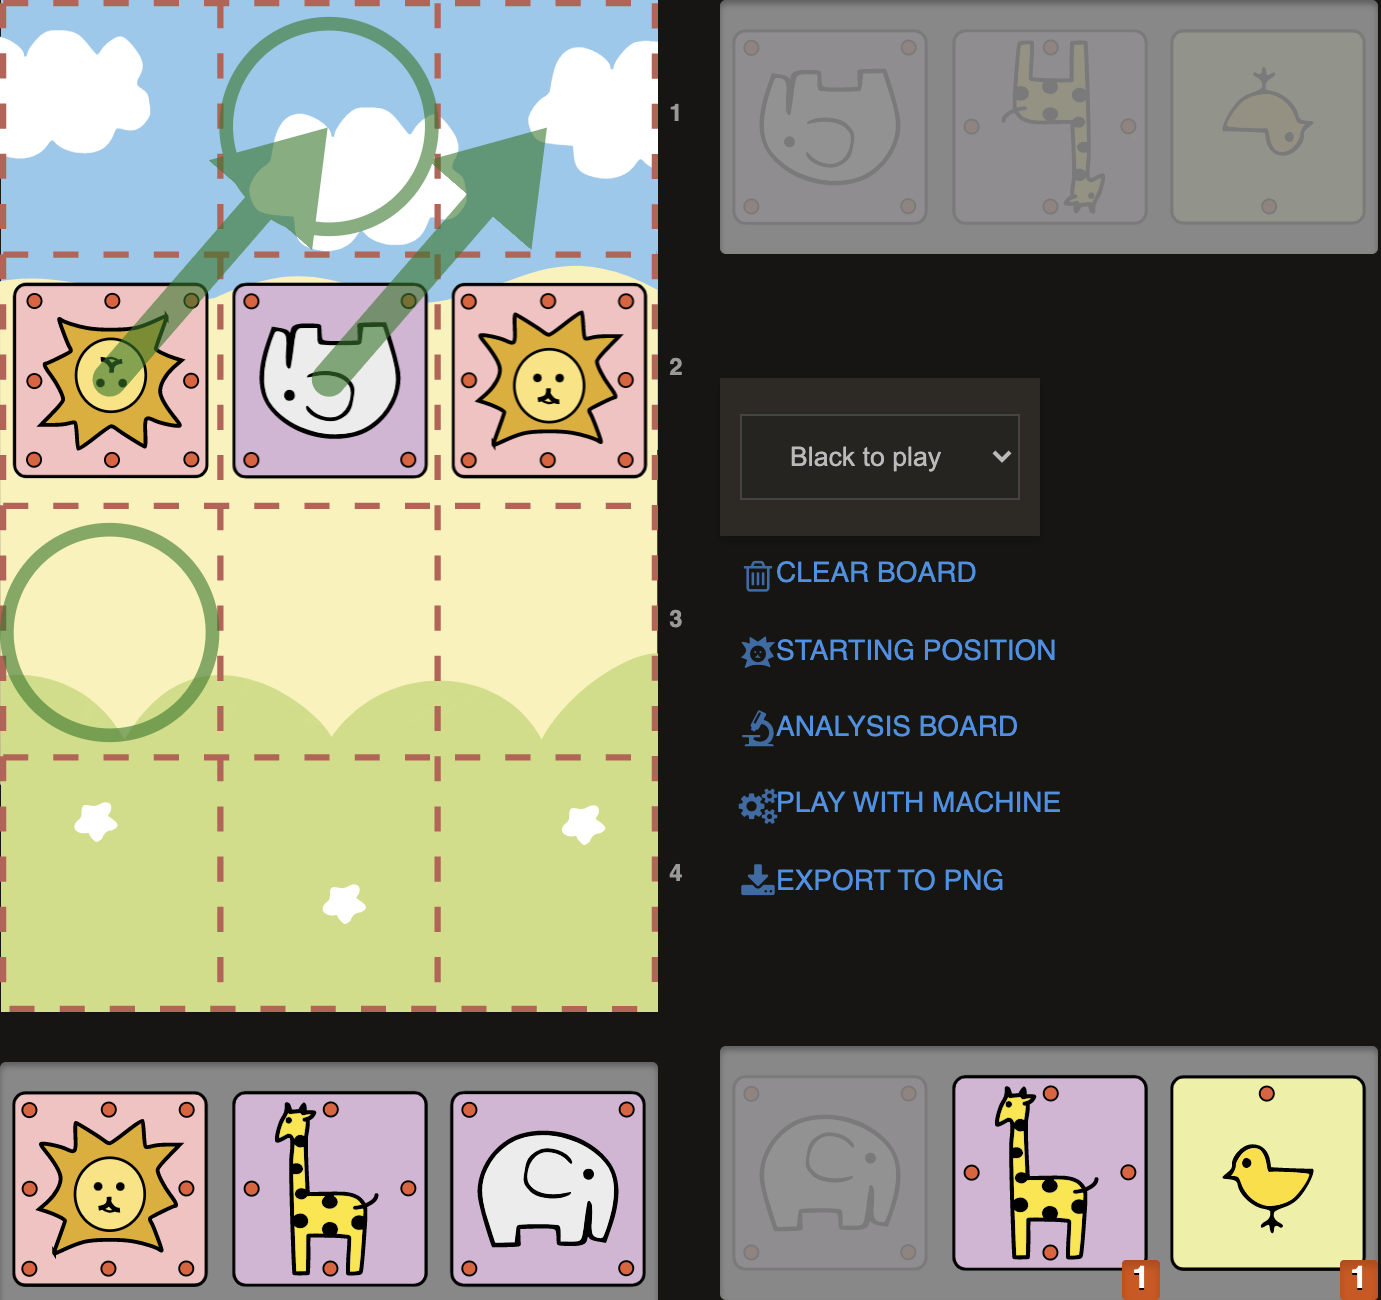
Key squares in the example above were b4 and c3, which were occupied with Elephant and Chick and therefore blocking Lion from escaping from corner via these squares. However, if we had an Elephant on c3, which is protected by another piece (for example by a Lion on b2 or a Chick on c2), it could also do the same job of controlling the key b4 square and occupying c3 square. This would make us to give a checkmate with two Elephants:
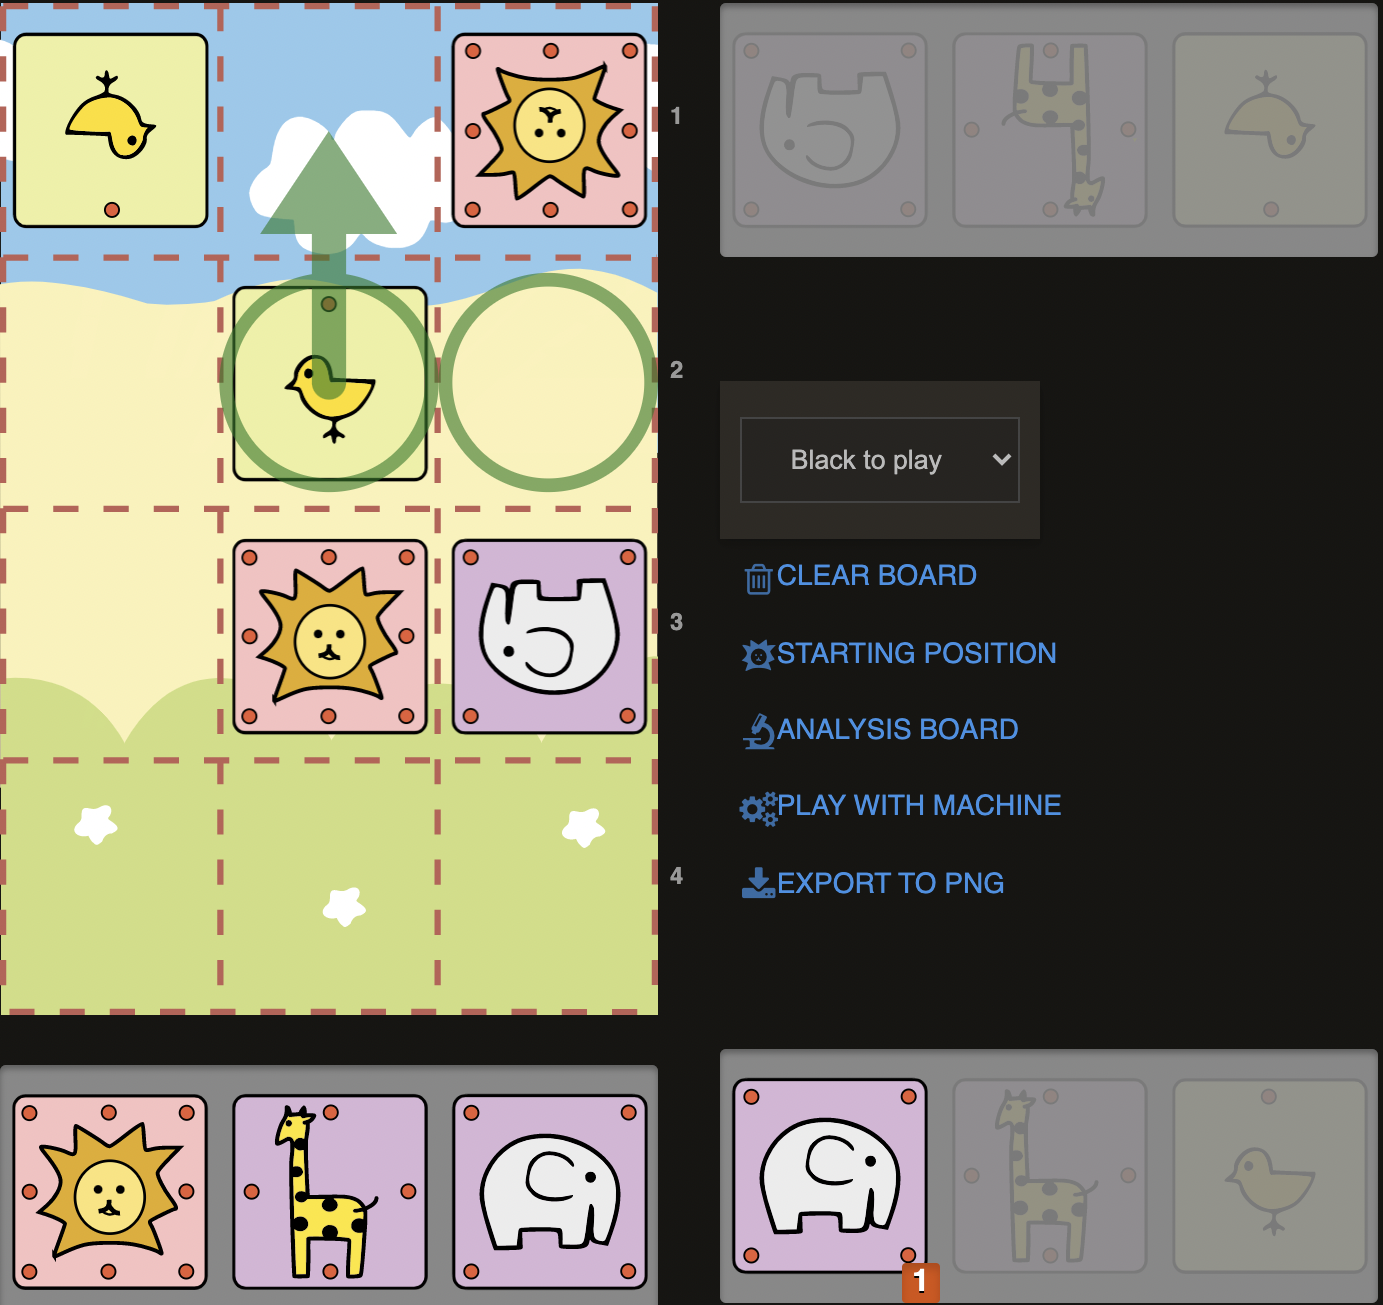
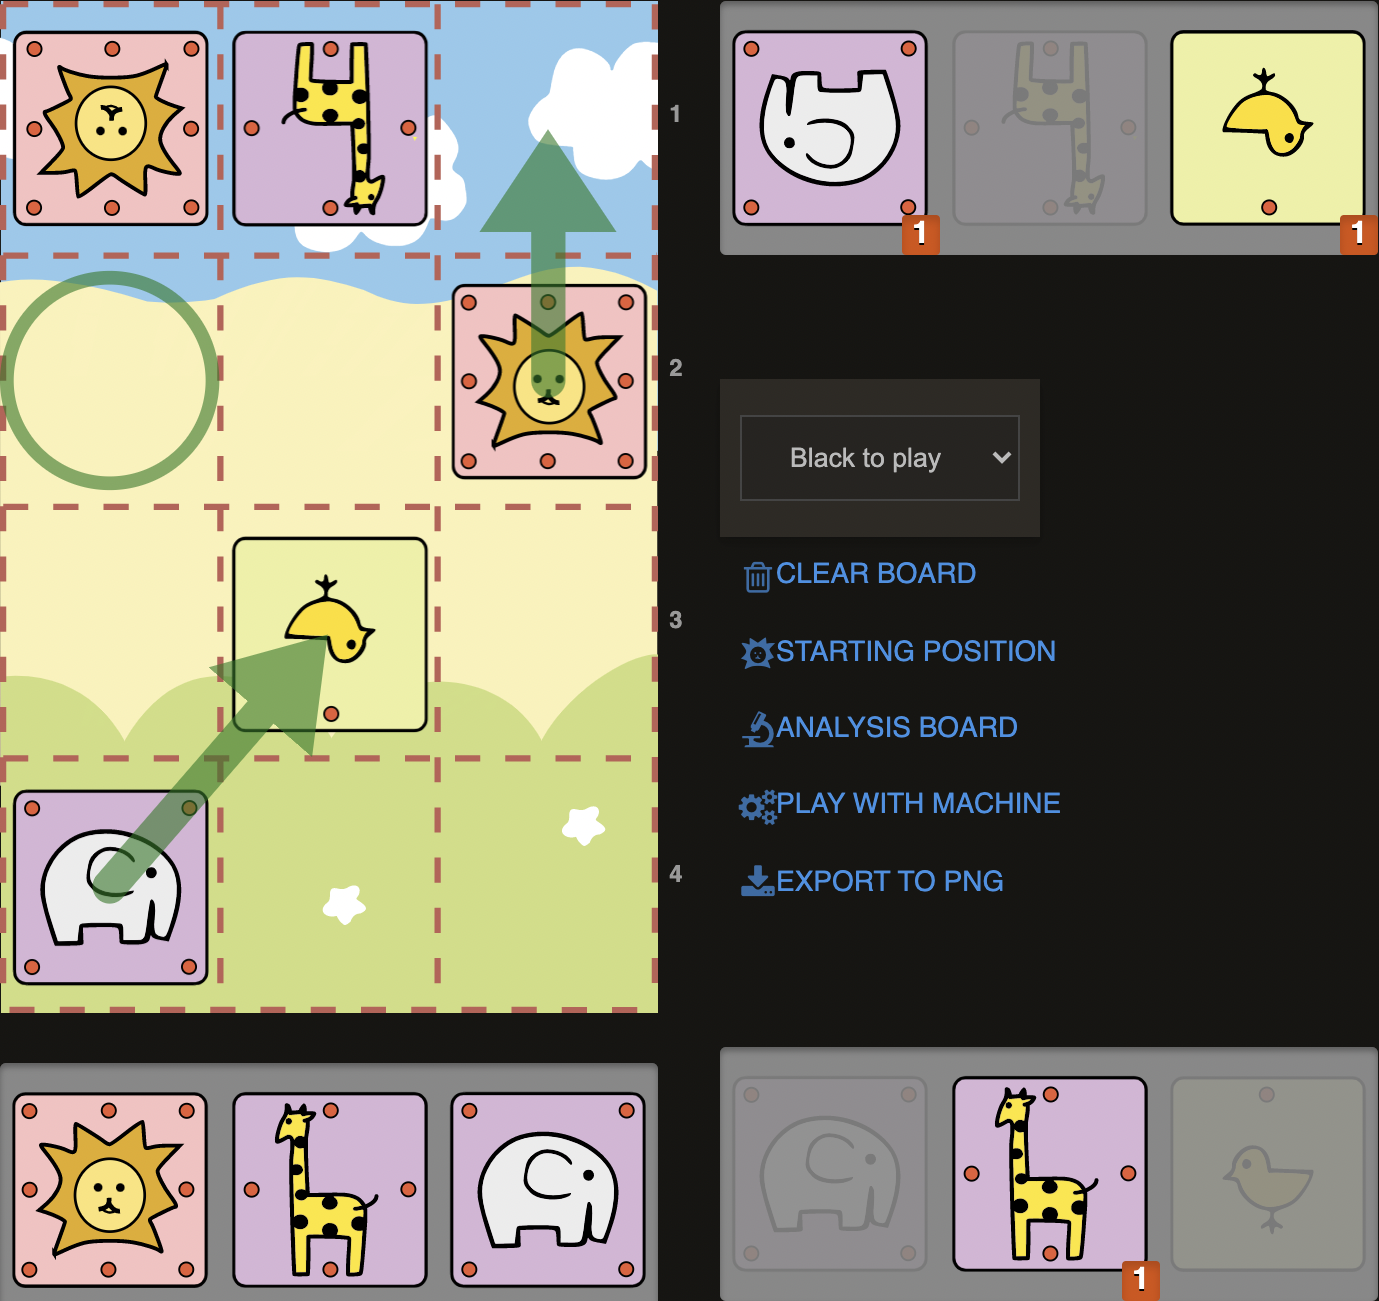
D4)
In this position, having two Elephants (one on the board, one in our pocket) and opponents Lion in the corner, we could already envision the Double Elephant checkmate. Our Lion is optimally placed on b2 here. But we need a little bit of work to set up the mating net. We would love to play our Elephant from c2 to b3 and drop the other Elephant to c3. But here we have to solve a little problem to reach that ideal: Our Chick is currently blocking the Elephant on c2. We would prefer however that b3 square to be free. So let’s simply get rid of the chick by sacrificing it and the problem solved! By playing 1.c.b4C+, we could promote the chick to a Chicken with a check and that gives us a crucial tempo. Sente has no choice but to accept our offer and take the chicken (1..Lxb4) . Now that we freed the important b3 square and drew the Lion to b4, we could drop an Elephant to c3 with check! (2.E@c3+) Lion cannot escape to a4, as it is occupied by a chick, so he has to go back to the right corner. (2...La4). We can now give the final knock-out blow with 3.E@b3# as in the previous example. This example shows us the true power of Elephant pairs!
So far we have seen examples where opponents Lion was first rank. (Sente’s first rank is 4th or final rank from the perspective of Gote) But Lion can get checkmated also on second and third rank! Such checkmates occur especially when the Lion is on the side of the board:
D5)
Last move of Sente was here C@b3 and setting up the starting position for himself back again. But in this particular position, this serves right into the hand of Gote as Gote has already developed his pieces. Sente’s Lion seems a bit stuck by his own pieces. Our Elephant on b2 is controlling both a3 and c3 squares, while Sente’s Elephant is simply blocked by a chick like a bad bishop is blocked by pawns and so it doesn’t defend any square. On the other hand, our Giraffe is doing a great job of ensuring an extra control of c3 square. We could take advantage of the control of c3 square to drag the Lion out of its cave by playing 1.Ec3+. Poor Lion, blocked by his own dysfunctional army could only go to a3 (1..La3), where it would get checkmated by a mere chicken: 2.C@a2#! This also highlights the importance of having pieces to drop and not the quantity but quality matters!
An Elephant on b2 is very useful in most cases. It is a natural square for it as Elephants on the sides of the board or in the corner lose their mobility drastically. (We’ll see more about Elephants in the Strategy and Piece Value Chapter) On b2, an Elephant is not only ready to join attacking forces by moving into c3 or a3, but also can play an important role in defense, especially from preventing the opponent's Lion from a Campmate: (Quick reminder: When Lion reaches final rank, it is called Campmate and it is game over!)
D6)
In this position, Sente’s Lion is threatening to play c2 and would capture the Elephant on c1 next, more importantly reaching the final rank and Campmate. Luckily it is our turn here and we can prevent Sente’s plan with an unexpected checkmating attack! Our pocket is empty, but that’s about to change after 1.Exb2+! This move would force Sente to play c2, as it cannot go back to first rank due to Giraffes (1...Lc2) It might look like we are helping Sente to realize his plans of Campmate by forcing him to 3rd rank. But we have our own plans of hunting him there: 2. C@c1#! This is a typical scenario of “The hunter becomes the hunted.” Elephant on b2 is doing great job of clamping the Lion on c2. Even though it looks like Lion is so close to reaching final rank, in many of the cases, all you need is just a Chick or a Giraffe on c1!
We have seen a couple of checkmating scenarios for Sente’s Lion being placed on the first, second and third ranks. But the Fourth rank, or the final rank from the Sente’s point of view (for Gote or for us here it would mean our first rank) would be a Campmate, meaning a victory for him, therefore checkmates on fourth rank is not legally possible due to rules of the games. Since we have touched on the topic of Campmate in our last example, it would be a good time to dive deeper into the theme of Campmate along with its interaction with checkmating ideas.
2. Campmates and Double Threats
In this section, we’ll talk about a very essential motif in Dobutsu: Double Threats. Double Threats such as threatening checkmate and campmate at the same time are very core tactical weapons in Dobutsu. Campmates are typically set up with checkmating threats, so that dealing with one of them results inevitably in allowing another one. These are slightly more complex ideas than the basic mating patterns, as we here simply make use of mating nets in a combination with the goal of campmate. Let’s see an example of it:
D7)
Here we see that we are so close to reaching finals with our Lion but Sente’s Lion and Elephants are preventing us from doing so. One thing to notice is that each of them only control one key square (Lion- b3, Elephant c3). This means if we can distract them, they would no longer be controlling. Considering we have a Giraffe and a Chick in our hand, we could try to drop one of them on a2 (1.G@a2+ or 1.C@a2+). If Elephant takes, then he will no longer defend c4. This leaves Sente with two options: Either capture the dropped piece on a2, or retreat to a4. If captured, again, he will no longer defend b4. This means capturing a2 with any piece is not an option. But on the other hand, if Lion goes back to a4 (1..La4) then Gote shows another card in hand: Checkmate with dropping a piece on a3 (2. C@a3# or 2.G@a3#)! This means, in this position dropping a piece on a2 would set up a double threat, which forces Sente to choose his way of losing: Either allow campmate or getting checkmated. Let’s take a look at another example:
D8)
Again we are so close to reaching the final rank with our Lion. Sente’s defense seems fragile: c4 is protected only by a Giraffe, which is then protected by Lion. Considering pieces we have in our hand as well, we could easily break this fragile defensive chain of Sente with a double threat: 1.E@b3+! This Elephant drop is obviously cannot be taken with Giraffe, as it would no longer defend c4. (1...Gxb3 2.Lc4# Campmate) So Sente has to move his Lion away from check: 1...La3. But this time he would get checkmated with a final drop by Gote: 2.G@a2#. Basically, after 1.E@b3+ Sente loses by force as he cannot deal with both of the threats. The key step for Gote was to be able to envision checkmating ideas with Giraffe before playing E@b3. Another example of the importance of pattern recognition and vision.
Sometimes, it does not even have to be a checkmate threat but we can force our opponent to capture a piece, which would distract it from preventing a campmate. These moves are almost like a checkmate, except that they are not literally checkmates but have similar forcefulness:
D9)
In the diagram above, Sente’s Lion is placed in the corner and reminds us probably of our previous example about Checkmating a Lion in the corner. Instinctively, we would feel like dropping a Elephant on b3 for a checkmate (1.E@b3+), but in this particular case, it would not result in a checkmate but a forced capture by Giraffe. (1....Gxb3) If Giraffe is forced to capture on b3, this would mean, it has to leave its place on b3, from where it defends c4. With another words, Sente’s is forced to allow a Campmate after that capture: (2.Lc4# Campmate). Let’s see another example for this type of forced captures, but this time by an Elephant instead of Giraffe:
D10)
Once again Sente’s Lion seems stuck in the corner, while the Elephant on b4 tries to do all the defensive tasks. Basically, it is overloaded and we can make use of that: 1. C@a3+! If it was a Giraffe on b4 instead of an Elephant, this Chick drop would already be a checkmate. But in this case, it forces a capture by Elephant (1..Exa3), so it has to leave b4 square and can no longer prevent our Lion marching to the final rank via c3-c4. (2.Lc3) Sente can retreat his Elephant back to b4 with a check (2..Eb4+) , but the Lion would slip away easily, as the Elephant cannot control c4: 3.Lc4# Campmate. Notice the example would not work if we had a Giraffe in our hand, since by capturing it, Sente would then have a Giraffe in his hands and could drop it to b4 ( 2..G@b4 instead of 2..Eb4+) in order to control c4 square. Nevertheless, this example demonstrates a fairly typical motif of piece distraction for Campmate. Let’s see one more example for this concept:
D11)
This time we have a powerful Giraffe on b3 and opponents Lion is stuck in the corner. Elephants are easily overloaded by taking care of a3 and c3 squares: Again 1.C@a3+! would lead Sente’s defense quickly to collapse. Sente is forced to capture with Elephant: 1...Exa3. And we could now march with our Lion to c3: 2.Lc3. Sente this time has a Giraffe in his hand and would desperately try to stop our Lion from reaching the final rank with 2..G@b4, which would then nevertheless get captured by our Giraffe with check: 3. Gxb4+. Sente is now forced to capture Giraffe back with his Elephant: 3..Exb4+, but we know from the previous example, this desperate check is not enough to stop our Lion: 4.Lc4# Campmate.
Let’s now look at a couple of fancier examples, involving a piece sacrifice in addition to our concept of double threat.
D12)
Once again, we are close to Campmate but we simply need a finishing touch. At first we could think of a checkmating idea like Exb2 and dropping a Chick or Giraffe on a3, or we could consider dropping a Giraffe on b3 with the hope Sente plays Gxb3, allowing us La4# like in the previous examples. Unfortunately, both of these plans are a bit slow and give Sente time to get out of immediate danger with throwing a check: C@a4+ .
Our Lion would have to go back to c2 (Lc2). Even though we might still win later on and have an advantage, it is always better to finish the game when you can by force. Here we just need to make our initial plan work by thinking out of the box. We want to take on b2 with our Elephant but wouldn’t it be better if opponents Lion was on a3 instead of c4 so we take the Chick with check? Let’s imagine Sente’s Lion on a3 and consider this scenario for a second. After Exb2+ Lion could either go to a4 back or a2 forward. But if Lion goes to a2, it would no longer defend the Giraffe on b4, so we could switch plans from Checkmate to Campmate with Lxb4#. On the other hand, Lion going back to a4 would result in a Checkmate with G@a3# like we have seen in previous examples. So we see that if the Lion was initially on a3, a Checkmate or Campmate would be inevitable.
Coming back to the actual position, where Lion is on a4, we would now consider how we could drive the Lion to a3 to capture b2 with check, since we figured out that Sente would lose if the Lion is on a3 when we capture on b2. Taking the scenario and all the facts (e.g. we have a Giraffe in our pocket) and thinking from a holistic perspective, we could play with the idea of dropping a Giraffe on a3, a sacrifice, just to drag the Lion to a3, like in our scenario. Last thing to check would be if losing a Giraffe would make a difference for our scenario: When the Lion goes to a2, we don't need any piece, we can simply take Lxb4. So having Giraffe doesn’t make any difference here. And if Lion goes back to a4 after Exb2+, we said we could drop a Giraffe on a3 and checkmate. But if we sacrifice, we won’t have a Giraffe in the hand. Do we really need a pricey Giraffe to checkmate? Even a Chick on a3 wouldn’t be enough for a checkmate. Considering that we would get a Chick with Exb2, we could our scenario work, just by re-considering and re-evaluating some situations. With those little adjustments of thought process, we can now transform our initial scenario into actually working reality. So here we go: 1.G@a3+! Lion is then forced to capture the Giraffe. 1...Lxa3. 2.Exb2+ and now If 2..La2, Simply 3. Lxb4# Campmate. If 2...La4, then as we spotted in our calculation: 3.C@a3#.
Our last example might seem obvious once we spot the solution to our problems, but when we examine our thought-process, we can see that the whole job was not a linear process. We needed to use our imagination (An assumptive scenario), to play with the ideas (sacrificing Giraffe to reach the position of our scenario), to look at them from different perspectives ( we’ve checkmated with a Chick instead of Giraffe). It was actually a fairly complex process, with back and forths of ideas as well as combination of them into a functioning bigger idea. We are now almost in advanced territory. Since we have survived through this example, I believe we can try to challenge ourselves with a tiny bit more complex examples now.
3. Complex Mates and Transforming Pieces
After playing a couple of Dobutsu games, you’ll notice that after some exchanges in your game, it is a very common situation that one side gets two Giraffes and the other side has two Elephants as the result of the trade. Whether these pieces are already dropped back to the board after the exchange, or being kept in hand to drop them later in a more favourable way, it is good to have a couple of ideas about what to do with them.
In this section, we’ll be looking at complex mate patterns as well as at the concept of transforming your pieces. This should serve us improving our thought-process as well as enriching our pattern recognition abilities. On a concrete level, we will realize this purpose with examples, in which we’ll be examining cases with one side (mostly Gote) having two Giraffes (GG) and the other side (mostly Sente) having two Elephants (EE). So at the end of this section, in addition to our abstract skills like an efficient thought-process etc. we’ll also have a couple of concrete ideas about typical situations to use in our games.
Giraffe pairs are a very powerful piece and they are the only pair of pieces in Dobutsu Shogi that can deliver mate without direct help of another piece. Elephant pairs still need the help of another piece defending them from getting captured when they give a check as they cannot protect each other like Giraffes do. Simply remember the example of checkmate with EE from the “Basic Mating Patterns” section. Lion was still helping the Elephants. But Giraffes can do the job without help of their own colleagues:
D13)
D14)
Whenever we have GG, we should keep the insight in mind that they are capable of supporting each other. Let’s use this insight with the integration of the concepts we’ve covered in the previous chapter!
D15)
In this example we have GG in our hand. How do we get most out of them? We need to find an optimal way to drop and use the GG-pair. First thing we’d check is if we can drop a Giraffe with a check. Unfortunately Sente’s Elephant on c2 is defending b3, so we cannot drop there. Other checks with G@a4+ or G@+c4 doesn’t make much sense either, as they can be captured for free by Sente’s Lion. So after initial evaluation, we haven’t spotted a useful way to drop a Giraffe with a check. But our position looks already good with our Lion standing powerful in the middle of the board, ready to march to Campmate at the first opportunity or ready to support a checkmating attack in need. So we can think of a move that improves position even more, such as G@a3, with the idea of dropping G@b3 next. This is a perfectly logical and natural move. We’ll talk about the idea of G@a3 in the next example more in detail. Let’s continue going through candidate moves, unless we have anything better, we can safely play G@a3.
Let’s consider couple of insights we have learnt in the previous chapters and examples so far:
A Lion on second rank can suddenly breakthrough to third and then final rank.
Giraffe pairs are powerful in giving mates while protecting each other.
Elephants are not the best back-rank defenders. They leave lots of holes in the defense.
So taking these into account, we could ask ourselves once again: “Is there a way to go for a Campmate, instead of looking for a direct checkmate?” If opponent’s Lion was not directly encountering our Lion, for example if it was on a4 or c4, we could try to march to a3/c3 (La3/Lxc3) and only move to defend would be Eb3 or E@b3. But Lion in the corner as we know is highly prone to getting checkmated. Considering that neither a3 square is controlled by our Chick, and c3 is occupied by Sente’s Chick, we could simply give a checkmate with G@b4#, regardless of if Sente’s Lion is on a4 (and ours would be on c3) or on c4 (our Lion would be then on a3).
Coming back to our actual position, just as in the last example of the “Campmate Section”, we can play with the idea of sacrificing one of our Giraffes (with G@a4 or G@c4) to draw the Lion into one of those losing squares (a4/c4) like in our scenario. Where Sente’s Lion will go depends actually on where we drop the Giraffe. So we have two options to consider: 1.G@a4+ and 1.G@c4+.
Let’s start with 1.G@c4+. Sente’s Lion could either play Lxc4 or La4. In case of 1.La4, Gote has two ways to give a checkmate: 2.Ca3# or 2.G@b4 (Giraffes protect each other!)
It seems then after 1.G@c4+ Sente has to play 1...Lxc4. 2.La3 Eb3 3.G@b4# seems to work as well. But we shouldn’t forget that we sacrificed a Giraffe to be able to play La3, so Sente does not have to play 2...Eb3 as we imagined in our initial scenario: Instead 2...G@b4! would stop 3.La4#. As there seems to be no way of distracting Giraffe from b4 either, 1.G@c4+ seems like a dubious line. So we better check the other way around.
The problem with 1.G@c4+ was that Sente could drop 2...G@b4! And we could do nothing. However, there seems to be a little detail (about Lion being on a4 instead of c4) that creates a big difference: a3 square is free for us to use! This means when Sente’s Lion is on a4 and Giraffe on b4, we could give a checkmate with G@a3# thanks to our Chick on a2 supporting a3. So if we start with 1.G@a4+ Lxa4 2.Lxc3 G@b4 we have a mate with 3.G@a3#. We only need to check the line with Lion not accepting our sacrifice: 1…Lc4. But this time we do have 2.G@b4# checkmate. (Once again powerful independent GG pair) We can safely conclude that 1.G@a4! gives a forced win thanks to a combination of checkmating and campmate ideas.
If we haven’t spotted the forceful winning sequence starting with 1.G@a4+, we could perfectly settle for 1.G@a3 as well. In this case, even though a slower win, it would still win and as they say: “you only need one win per game”. Such moves needs to be carefully played though, because we need to check resources of Sente that would try to separate our Lion from protecting the Giraffe on a3. For example 1.G@a3 and 1...E@a1+. In this particular position, this Elephant Check would not have any effect other than prolonging our winning sequence as we can simply 2.Lxa1 and come back to b2 next (3.Lb2). The Giraffe is protected by the chick on a2, so our Lion can move around without worry about the Giraffe. But these type of backrank checks with drop such as E@a1+, E@c1+,G@b1+ are very important defensive resources to consider, especially when our piece on third rank is only protected by our Lion. In the following example, let’s examine the main idea behind a move like 1.G@a3 as this a fairly common winning plan as well:
D16)
This position is not exactly the same as our previous diagram but a very similar one to, our previous example. Simply imagine that in the last diagram Elephant was initially dropped to b3 instead of c2 and after that following moves were played: 1.G@a3 E@c3. So we would reach this position, which is a fairly typical position in many opening lines.
A typical idea for this type of position with Chick on c3 and the particular placement of the Lions would be a backrank mate as in the very first example in the “Basic Mating Pattern” section. But this was done with a Giraffe and Elephant. Here we have two Giraffes, while the opponent has two Elephants. A trade of one Giraffe for Elephant would be highly desirable here as well, as we would then have an Elephant and a Giraffe to deliver a backrank checkmate. We just need an Elephant on a3 instead of a Giraffe. In the diagram above, we could accomplish this transformation easily by exchanging our Giraffe with the Elephant on b3: 1.Gxb3+ Exb3 (1..La4 2.Ca3#) then simply drop the captured Elephant on a3: 2.E@a3+ La4 3.G@b4#.
What if our Giraffe and Chick was reversed in the diagram and Sente haven't dropped the chick? No problem at all:
D17)
Here we can visualize a checkmate, if we had an elephant in hand to drop. But we have a Giraffe instead. Is it possible somehow to transform our Giraffe into an Elephant? Well a executed exchange would certainly favour our plans. We could think of dropping the Giraffe on c3, to capture one of the Elephants next. But since our other Giraffe is on a2, we cannot have its help for a typical backrank mate as in the previous example. So this plan seems slow and not efficient. If there was no piece on b3, G@a4# would be a checkmate since the Chick on a3 would be defending it . In this particular position, 1.G@a4+ would be captured by the Elephant on b3 (1..Exa4). To be precise: It has to capture! Then we could capture the Elephant back with Chick (2.cxa4.C+). So this means we could force a trade of our Giraffe with an Elephant, at a cost of Chick (2...Lxa4). This is however a very low price to pay for giving a checkmate. We might be trading Giraffe+Chick for a mere Elephant, but we do have a concrete plan. On the bright side of things, losing a piece means having a square freed. In this case, the now free square a3 could be used by our Giraffe to give a check and force the Lion to go to b4: 3.Ga3+ Lb4.
Now we have reached the position we desired, we can joyfully drop the Elephant on c3 to finish the game: 4.E@c3#. (Full solution: 1.G@c4+ Exa4 2.cxa4.C+ Lxa4 3.Ga3+ Lb4 4.E@c3#)
There can also be situations where we have the Elephant-Pair and the opponent has the GG-Pair:
D18)
This is a typical position that can be reached only after 4 moves in a game. Sente’s last move,C@b3 was a fatal mistake. Let’s see how we can punish Sente for that.
It is usually good to start considering with forced moves, such as checks and see if they lead to anything. Here we could give a check with either E@a3+/Ea3+ or E@c3+/Ec3+. If we give a check on c3, Lion can go to c4 and we don’t have a good follow up. We’d rather have the c3 square free to drop our chick. We can consider therefore starting from a check via a3 square and if Lion goes to c4, now we could drop a chick on the free c3 square and that would be a checkmate. But the problem with E@a3+ is a3 square is defended twice by Sente, while once by Gote. This means a material loss after all the captures for us. However if we think of the resulting position after 1.E@a3+ Gxa3 2.Exa3+ Lxa3 (since the first capture is forced due to 1.E@a3+ Lc4 2.C@c3#), Sente’s Lion is no longer guarding c3 square, so our Lion on c2 can try marching to c4 via c3. So we have a new card in our hand to play: Campmate. Therefore 1.E@a3+ seems to be a good candidate move for distracting Lion. We need to examine a bit further.
We should also keep in mind that Sente has another Giraffe in their hand, so they could try to mess with our Campmate plan with a move like G@b4. So after 1.E@a3+ Gxa3 2.Exa3+ Lxa3 3. Lc3 (threatening Lc4#) only move for Sente would be 3..G@b4. Sente’s defense feel however very fragile. Giraffe is only defended by the Lion, so if we could distract Lion further, like to a2, we could easily capture the Giraffe with Lxb4# Campmate. A chick or a Giraffe would do the job for such a try. Fortunately we already had a chick in our hand before all these exchanges on a3 and now we have a precious Giraffe as well, for which we paid with two Elephants. We could drop one of the pieces we have in hand on a2 and see what happens: 4.C@a2+. As we have know, 4...Lxa2 is not an option for Sente due to 5.Lxb4#. So 4...La4 is the only move. But to that we could switch gear and deliver a checkmate with 5.G@a3# instead of our 5...Lxb4# Campmate threat. This means our fourth move 4.C@a2+ sets up a double threat of Checkmate and Campmate. It seems like Sente has no way to deal with both of these threats. Considering that the whole of these lines were in some way pretty forced, we can then conclude that Gote can force a win in the initial diagram. (Full solution sum up: 1.E@a3+ (1...Lc4 2.C@c3#) Gxa3 2.Exa3+ Lxa3 3. Lc3 G@b4 4.C@a2+ La4 (4..Lxa2 5.Lxb4#) 5.G@a3#.)
Now that we have covered more complex topics such as piece sacrifices or strategical exchange sacrifices, double threat of Campmate+Checkmate, let’s see a fancy example covering all these topics to conclude the chapter:
D19)
Once again we do have The GG-Pair against The EE-Pair and all of them are already dropped on the board. Our Lion seems also optimally positioned in the middle of the board, ready to march to 3rd rank to threaten Campmate anytime, as soon as Sente’s Lion moves aside. The Elephant-Pair are on the “same color” - to speak with chess terminology -. They are protecting each other, but on the other hand they are having a fight over common squares and blocking each other. All of the pieces except Lion are placed on the a-file, so Sente’s position seems cramped. So how can we convert our positional advantage into a victory here as Gote?
If one of the Giraffe was in hand instead of on the board, we could think of setting up an exchange to get an Elephant (for example with Gxb3+ at some point) to give our typical backrank checkmate with The E+G Pair (for example E@c3+/G@b4#). We need another plan like maybe Campmate-threats. For that only the route via a3 would be possible since it seems very hard to push Sente’s Lion to a4 and it can only be pushed to c4, so we breakthrough via a3. It’s worth therefore checking what happens if we sacrificed a Giraffe like with 1.Gc4+ to force 1...Lxc4, so that we can get our Lion to a3 with 2.Lxa3 and threaten Lxa4# next. On a3, we seem so close so we should start looking for possible defenses and how we can break that defense or if we can set up a double threat as in the previous examples.
There are 3 ways for Sente to defend Elephant on a4: either with a move with one of the Elephants ( E4b3 or E2b3 ) or G@b4.
Let’s start with G@b4. If we’d assess the arising position after 2...G@b4, we can see that Lion in the corner feels somehow in almost mating net (Remember the checkmating patterns) for example, we could threaten checkmate with 3.Gc2 with the idea of 4.C@c3#. What can Sente do against this checkmating threat then? Lion cannot move, Giraffe is busy defending a4, so it cannot move as well to b3 to stop the 4.C@c3# threat. Any moves with either of Elephants to b3 have no effect on the square c3, so they cannot stop the threat as well. This means Sente is basically in zugzwang. 2...G@b4 is not a real option for Sente. Let’s see the other two options.
Which Elephant move to b3 does not seem to make a big difference other than the idea that 2...E2b3 defends a4 as well as threatening 3...G@a2# checkmate at the same time, so this move seems more logical to the other. This also means that we don’t have time for our Mate-in-two plan as in the 2..G@b4 line, since Sente threatens now after 2..E2b3 a mate-in-one. We need to execute our plan in a more forceful way, this means we need to start with a check maybe and see what this does: 3. C@c3+ and Lion is forced to take 3...Lxc3. Again, we need to continue with a check otherwise we would get checkmated with G@a2#. We now have two ways to check: first is to play 4.C@c2+ to which Lion is not forced to capture but forced to retreat back: 4...La4 we could keep giving our pieces for checks, but this doesn’t seem to lead anywhere after: 5.Cc3+ Lxc3 6.Gc2+!? And hoping to be captured, since if 6..Lxc2 would leave the square b4 undefended: 7.Lb4#. Other reply, 6..Exc2 would be met with 7.Lxa4# Campmate. Unfortunately, Sente is not forced to capture the Giraffe after 6.Gc2+ Lc4. At that position, with Lion in the corner and our Giraffe on c2, we’d need a mere Chick to give a checkmate C@c3#, but we did sacrifice both of them.
Is there another way to make 4.Gc2+ work somehow by altering the previous moves, because with 4.Gc2+ it felt so close to victory. We only needed a chick in hand to drop at the end, so let’s see if we can make the whole idea work with only one chick sacrifice. For that purpose, we could think of after 1.Gc4+ Lxc4 2.Lxa3 E2b3 3.C@c3+ Lxc3 this time 4.Gc2! Instead of 4.C@c2+. This would save us the Chick, which we can now drop on the c3 if the Lion goes back to c4 ( 4..Lc4 5.C@c3#) But we already know that taking on c2 with either of the piece, Lion or Elephant, is not possible as they allow either Lxb4# or Lxa4#. This means, we have found a forcing winning sequence:
Full solution is then: 1.Gc4+! Lxc4 2.Lxa3 E2b3 {E4b3 does not make difference and 2...G@b4 loses after 3.Gc2 since only way to prevent 4.C@c3# would be 4..Gb3, which then allows 5.Lxa4#} 3.C@c3+! Lxc3 4.Gc2+!! Lxc2 (4..Exc2 5.Lxa4# or 4..La4 5.C@c3#) 5.Lb4#. What a sequence! We sacrificed two Giraffes and a Chick, but it was worth the result.
In this chapter we have started with very basic checkmating patterns (42 of them) and tried to build our tactical vision on these patterns. We have dealt with double threats and saw how we can try to apply them to different kinds of positions. We have seen typical ideas for typical positions narrated with an example thought process. Examples can be extended endlessly. Besides the concrete examples and ideas, the main point of this chapter was to show an effective way of calculation and demonstrate how to apply your tactical ideas into a well executed plan. This is why I decided to explain details in depth to share my thought-process instead of just giving answers and cutting it short. After all, number of examples can be extended endlessly. These are to be discovered by you in your games and learn from them as you go through in your journey in the Dobutsu Shogi world. With time and practice, your tactical vision, pattern recognition abilities will improve naturally and your calculation process will get much more efficient and cleaner. Basically, rest is a matter of practice!